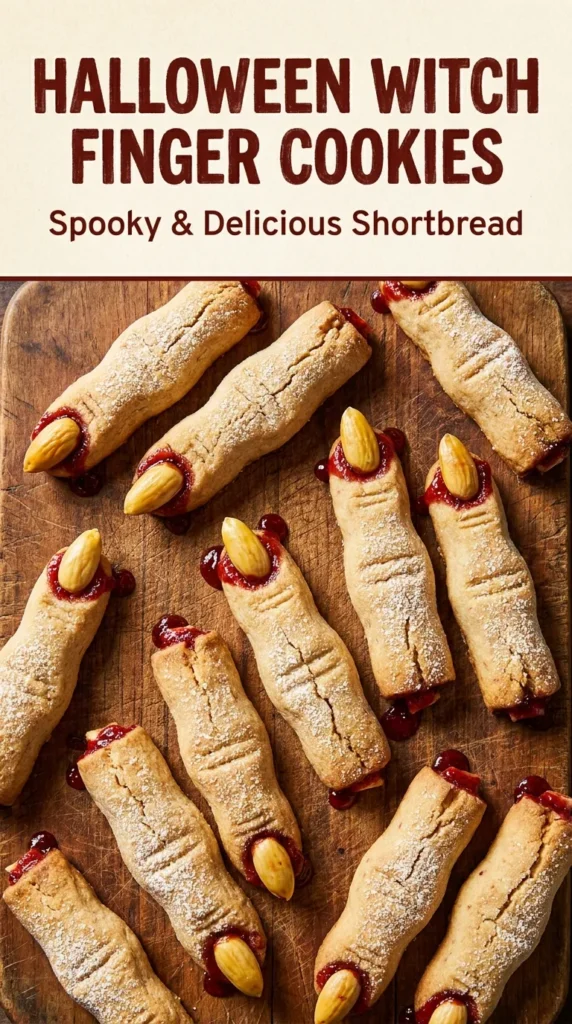
Warm, toasted almond scents filling the kitchen are the first sign that something magical is happening!
Do you really think creating hyper-realistic, creepy cookies requires professional pastry chef skills?
You are about to discover that these sinister treats are actually a breeze to whip up in your own home! We are making cookies that look exactly like severed fingers, complete with knob almond nails.
Everyone loves these because they balance a sophisticated nutty flavor with a visual that is absolutely shocking!
Unlike store-bought Halloween cookies that often taste like generic sugar, these have a buttery, almond depth that feels gourmet.
Parents will find these perfect for involving the kids in a spooky baking project that isn’t too stressful.
Let’s dive into the dark magic of this bake!
- ●Why You’ll Love This Recipe
- ●A Brief Background / Why This Recipe Works
- ●Perfect For Spooky Parties and Family Fun
- ●Main Ingredient Spotlight: Almond Extract
- ●Secondary Ingredient Spotlight: Unsalted Butter
- ●Key Ingredients
- ●How to Make It
- ●Pro Tips
- ●Delicious Variations
- ●Best Ways to Serve
- ●Storage and Leftovers
- ●Frequently Asked Questions
- ●Why This Recipe Belongs in Your Weekly Rotation
- ●Final Thoughts
There are so many reasons to be obsessed with these creepy cookies!
- ●The visual impact is unmatched because the almond slivers create a terrifyingly realistic fingernail.
- ●The flavor profile is sophisticated since the almond extract provides a professional bakery taste.
- ●Prep time is minimal which means you can spend more time decorating your house for Halloween.
- ●Kids absolutely adore the process of sculpting the dough into creepy shapes.
- ●The dough is incredibly stable so the fingers won’t melt into puddles in the oven.
- ●They pair perfectly with a variety of drinks from dark roast coffee to red punch.
- ●You can make them in large batches because they store beautifully for a week.
- ●The contrast between the sweet cookie and the creepy look creates a great conversation starter.
You truly cannot go wrong with a treat that tastes this good and looks this scary!
A Brief Background / Why This Recipe Works |
Creating a cookie that maintains its shape is the biggest challenge when making sculpted treats. Most cookies spread too much, but this specific ratio of flour to fat ensures the “fingers” keep their length.
The chemistry relies on the cold butter and the precise amount of leavening. rise, we ensure the knob sculpt stay visible after the baking process is complete.
Adding a touch of almond extract doesn’t just add flavor; it complements the actual almond used for the nail, tying the whole sensory experience together.
It is a masterclass in food styling that anyone can achieve. Spooky Witches Fingers A Sinister Delight For Halloween Easy Halloween Cookies
Perfect For Spooky Parties and Family Fun |
These are a total knockout for Halloween parties where you want a dessert that doubles as decor. They look amazing piled up on a platter or arranged in a spooky cauldron.
Busy parents will love these for school treats because they are easy to transport and don’t require refrigeration.
Family dinners during October become an event when the kids help “sculpt” the fingers. It transforms baking into a creative art session.
Holiday gatherings are the peak time for these, providing a whimsical yet eerie touch to the dessert table.
Main Ingredient Spotlight: Almond Extract |
Almond extract is the secret weapon here because it provides a deep, aromatic sweetness that mimics the scent of marzipan. This flavor profile is essential for masking the “plainness” of a sugar cookie and giving it a high-end feel.
Beyond taste, the extract enhances the perception of the almond nail, making the whole cookie feel cohesive. It transforms a simple sweet treat into a complex dessert.
Secondary Ingredient Spotlight: Unsalted Butter |
Butter provides the necessary fat to keep the cookies tender and rich. Using unsalted butter is critical here so that you can control the salt balance perfectly, ensuring the almond flavor isn’t overpowered.
When creamed with sugar, the butter traps tiny air bubbles. These bubbles help the cookie hold its structure while providing that melt-in-your-mouth texture we all crave.
Key Ingredients |
Grab these essentials to start your sinister baking session!
- ●Butter — creates the rich base and provides the structural fat.
- ●Granulated Sugar — adds sweetness and helps with the browning process.
- ●Egg — acts as the binder to hold the dough together during sculpting.
- ●Almond Extract — provides the signature spooky bakery aroma and taste.
- ●All-Purpose Flour — the primary structure that prevents the fingers from spreading.
- ●Baking Powder — gives a slight lift without making the fingers puff up too much.
- ●Salt — balances the sweetness and enhances the other flavors.
- ●Whole Almonds — used to create the creepy fingernails.
How to Make It |
Follow these steps closely to ensure your fingers look appropriately haunting!
- Cream the fats: Beat the softened butter and sugar together until light and fluffy. If you under-beat this stage, your cookies might be too dense and won’t have that professional crumb.
- Add the aromatics: Mix in the egg and almond extract. Be sure to scrape the sides of the bowl so no pockets of unmixed butter remain, which could cause uneven baking.
- Combine dry ingredients: Gently stir in the flour, baking powder, and salt. Avoid over-mixing at this stage; over-working the gluten will make your fingers tough and bread-like rather than tender.
- Chill the dough: Place the dough in the fridge for about 30 minutes. This is a non-negotiable step because cold dough is much easier to shape and resists spreading in the oven. Spooky Halloween Cookies Recipe Fun Creepy Treats
- Sculpt the fingers: Roll small pieces of dough into cylinders about 3-4 inches long. Use your finger to press small indentations for the knuckles to make them look realistic.
- Attach the nails: Press a whole almond into the tip of each finger. Make sure it is pushed in firmly so it doesn’t fall off while the cookies are baking.
- The bake: Place them on a parchment-lined sheet and bake until the edges are just barely golden. Do not overbake, or you will lose the detailed knuckle shapes you worked so hard to create.
- The cool down: Let the cookies cool on the pan for 5 minutes before moving them. This prevents the delicate “fingers” from snapping while they are still soft.
1Use these tricks to take your treats from spooky to terrifying!
2The Wrinkle Trick: Use a toothpick to carve small lines around the knuckles to mimic skin wrinkles.
3Uniform Sizing: Use a small cookie scoop for the initial dough balls so all your fingers are the same length.
4Temperature Control: If the dough becomes too sticky while sculpting, pop it back in the fridge for 10 minutes.
5Avoid Over-Browning: Keep a close eye on the oven; if the cookies get too dark, the “skin” look is lost. Spooky Halloween Cookies Recipe Fun Creepy Treats Easy Halloween Dessert Ideas
6Almond Security: Dab a tiny bit of melted butter on the almond before pressing it in for extra grip.
Delicious Variations |
Feel free to put your own twist on these ghoulish delights!
- ●Chocolate Fingers: Add cocoa powder to the flour for a “zombie” or “burnt” effect.
- ●Blood-Stained: Use a drop of red food coloring or raspberry jam around the almond nail.
- ●Vanilla Twist: Swap the almond extract for vanilla if you prefer a classic sugar cookie taste.
- ●Gluten-Free: Use a high-quality 1:1 gluten-free flour blend for a dietary-friendly version.
- ●Maple Scent: Use maple extract instead of almond for a cozy, autumnal flavor profile.
No matter which version you choose, the creepy aesthetic remains the star of the show!
Best Ways to Serve |
Presentation is everything when it comes to Halloween treats!
- ●Arrange them on a black platter to make the colors pop.
- ●Place them inside a plastic cauldron filled with dry ice for a smoking effect.
- ●Serve them on a mirrored tray to double the spookiness.
- ●Pair them with a “blood-red” sangria or a dark chocolate milkshake.
For a truly immersive experience, place the cookies in a glass jar with a label that says “Witch Parts.” This adds a level of storytelling to your dessert table.
You can also serve these as part of a larger spooky platter alongside other themed treats. Creepy Halloween Eyeball Cookies Easy Spooky Dessert Ideas For Parties
Storage and Leftovers |
Refrigerating
Store these in an airtight container in the fridge for up to 7 days. This keeps the butter fresh and the cookies moist.
Reheating
These are best enjoyed at room temperature, but you can warm them in a 300F oven for 2 minutes to revive the aroma.
Freezing
Freeze the unbaked dough cylinders for up to 3 months. Simply bake them directly from frozen, adding 2 extra minutes to the cook time.
Frequently Asked Questions |
- ●Q: Why did my cookies flatten out in the oven?A: This usually happens because the dough was too warm or you used too much butter. Ensuring the dough is chilled for at least 30 minutes before baking is the best way to prevent the fingers from losing their shape.
- ●Q: Can I use slivered almonds instead of whole ones?A: While slivered almonds work in a pinch, they don’t provide that realistic “nail” look. For the best visual effect, use whole blanched almonds as they fit perfectly on the end of the sculpted dough.
- ●Q: How do I make the knuckles look more realistic?A: Use a toothpick or the back of a knife to gently press creases into the dough. Doing this while the dough is cold ensures the lines stay sharp and don’t blend back together during the bake.
- ●Q: Can I make these without almond extract?A: Yes, you can substitute it with vanilla extract or even orange extract for a different vibe. However, the almond extract is what gives these their signature “professional bakery” flavor that complements the almond nails perfectly.
- ●Q: What is the best way to prevent the almonds from falling off?A: Make sure you press the almond deep into the dough. If you find they are slipping, you can use a tiny dot of egg white as a “glue” to keep the nail firmly in place.
- ●Q: Can I use margarine instead of butter?A: You can, but the flavor and texture will be different. Butter provides a richness and a specific structural stability that margarine lacks, which may result in cookies that spread more or taste less complex.
Why This Recipe Belongs in Your Weekly Rotation |
While these are themed for October, the base recipe is essentially a perfected almond shortbread. This means you can use the same dough for other shapes throughout the year.
Having a go-to treat that impresses guests without requiring hours of labor is a huge win for any home cook. It removes the stress from holiday hosting while ensuring you are the star of the party.
The joy of creating something that looks scary but tastes heavenly is a thrill every time. Spooktacular Halloween Cauldron Cookie Recipe For Fun Treats
Once you master the sculpting technique, you will find yourself looking for any excuse to bake these again!
Final Thoughts |
These treats combine a sophisticated almond flavor with a playful, eerie design that is sure to impress. They are simple to make, easy to customize, and always a hit at any Halloween gathering.
You should make these because they bring a touch of creative magic into your kitchen and a lot of laughs to your guests. It is the perfect blend of baking science and holiday spirit.
Grab your apron and start sculpting some sinister sweetness today!
Halloween Witch Finger Cookies
- Total Time: 57 minutes
- Yield: 24 cookies 1x
Description
Creepy, realistic-looking cookies with a sophisticated almond flavor and whole almond fingernails. Perfect for Halloween parties!
Ingredients
- 1 cup unsalted butter, softened
- 1 cup granulated sugar
- 1 large egg
- 1 tsp almond extract
- 2 1/4 cups all-purpose flour
- 1 tsp baking powder
- 1/2 tsp salt
- 24 whole almonds
Instructions
- Preheat oven to 350F (175C) and line a baking sheet with parchment paper.
- Cream butter and sugar together until light and fluffy.
- Beat in the egg and almond extract until well combined.
- Stir in flour, baking powder, and salt until a dough forms.
- Chill dough in the refrigerator for 30 minutes.
- Roll dough into 3-inch cylinders and press creases for knuckles.
- Press one whole almond into the tip of each finger.
- Bake for 10-12 minutes or until edges are just barely golden.
- Cool on pan for 5 minutes before transferring to a wire rack.
- Prep Time: 45 minutes
- Cook Time: 12 minutes
- Category: Dessert
- Method: Baking
- Cuisine: American