Cooking vegetables on a busy weeknight often means choosing between speed and flavor. Traditional roasting takes a long time to preheat and cook, which can be frustrating when you need dinner on the table quickly.
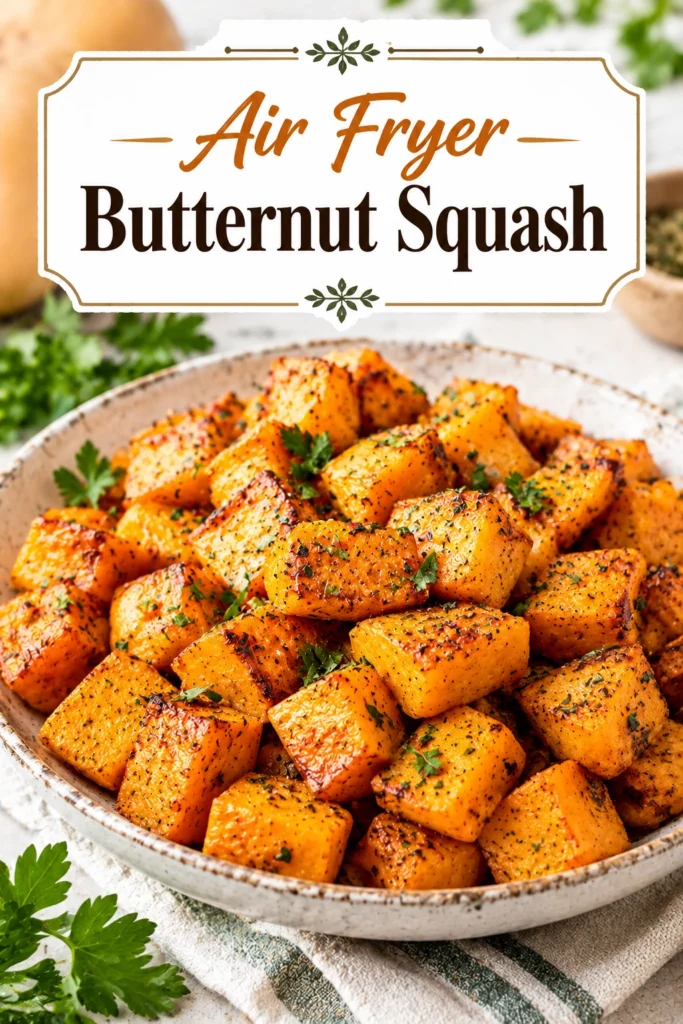
This air fryer butternut squash recipe provides a fast alternative to the oven. It creates a side dish with a tender center and crisp edges in a fraction of the usual time.
Many home cooks prefer this method because it minimizes cleanup and avoids the heat of a large oven. The concentrated airflow browns the squash efficiently, intensifying the natural sugars.
The result is a concentrated sweetness and a distinct toasted aroma that fills the kitchen as the squash caramelizes.
Compared to store-bought frozen options, these fresh cubes retain a better structure and a more vibrant flavor profile. It is a simple way to elevate a basic vegetable.
This recipe is ideal for anyone wanting a nutrient-dense side dish without the long wait. It fits perfectly into a healthy meal rotation for families or individuals.
The following guide explains how to achieve the best texture and flavor using your air fryer.
- ●Why You’ll Love This Recipe
- ●A Brief Background / Why This Recipe Works
- ●Perfect For Healthy Weeknight Sides
- ●Butternut Squash Spotlight
- ●Olive Oil and Seasoning Spotlight
- ●Key Ingredients
- ●How to Make It
- ●Pro Tips
- ●Delicious Variations
- ●Best Ways to Serve
- ●Storage and Leftovers
- ●Frequently Asked Questions
- ●Why This Recipe Belongs in Your Weekly Rotation
- ●Final Thoughts
This method transforms a dense winter squash into a light, caramelized treat using minimal effort and energy.
- ●The air fryer reduces cooking time compared to standard oven roasting.
- ●Small batches of squash cook evenly without the need for large baking sheets.
- ●The high-heat circulation creates a charred exterior that mimics a professional roast.
- ●It requires very little oil while still achieving a non-stick, crispy finish.
- ●The natural sweetness of the squash is enhanced through rapid caramelization.
- ●Cleanup is limited to a single basket rather than multiple pans.
- ●It serves as a versatile base for salads or a standalone side dish.
- ●Preparation is straightforward, requiring only basic chopping and tossing.
These practical advantages make it a reliable choice for any day of the week.
A Brief Background / Why This Recipe Works |
Butternut squash contains natural sugars that react to high heat. In a traditional oven, these sugars take a long time to brown because the heat is less concentrated around the food.
The air fryer functions as a powerful convection oven. It pushes hot air rapidly around the cubes, which removes surface moisture quickly. This allows the Maillard reaction to happen faster, creating those sought-after brown edges.
Because the basket is smaller than an oven, the heat remains more consistent. This prevents the bottom of the vegetables from becoming soggy, a common issue with crowded sheet pans.
The result is a balanced texture where the outside is slightly crisp and the inside remains buttery and soft.
Perfect For Healthy Weeknight Sides |
On busy Tuesday or Wednesday nights, finding time to roast vegetables can be difficult. This recipe allows you to prepare a nutritious side dish while you focus on the main protein.
It also works well for meal prep. You can cook a large batch of squash on Sunday and add it to bowls or salads throughout the week. For those who enjoy complex flavors in a simple format, this is a great addition to a healthy diet.
During the autumn and winter months, this dish pairs excellently with hearty proteins or as part of a festive holiday spread. It provides a bright, sweet contrast to savory meats.
Butternut Squash Spotlight |
Butternut squash is prized for its smooth, creamy texture and mild, nutty flavor. Unlike some other winter squashes, it has a high sugar content that browns beautifully under heat. Its dense flesh holds its shape well during the air frying process, preventing the cubes from turning into mush.
Olive Oil and Seasoning Spotlight |
Olive oil acts as the heat conductor, ensuring the squash doesn’t dry out and helping the seasonings adhere to the surface. You can substitute this with avocado oil if you prefer a higher smoke point.
Salt and pepper are essential to balance the natural sweetness of the squash. Without them, the flavor can feel one-dimensional. Adding a pinch of garlic powder or paprika can introduce a savory depth that complements the sweetness.
Key Ingredients |
These simple components combine to create a flavorful, caramelized vegetable side.
- ●Butternut Squash — provides the hearty base and natural sweetness
- ●Olive Oil — ensures even browning and prevents sticking
- ●Salt — enhances the inherent flavors of the squash
- ●Black Pepper — adds a subtle spicy contrast
- ●Garlic Powder — introduces a savory, aromatic depth
How to Make It |
Follow these steps to ensure your squash is cooked through and perfectly browned.
- Prepare the squash: Peel the butternut squash and remove the seeds. Cut the flesh into uniform 1-inch cubes. Keeping the size consistent is vital so that every piece cooks at the same rate.
- Season the cubes: Place the cubes in a large mixing bowl. Drizzle with olive oil and sprinkle with salt, pepper, and garlic powder. Toss thoroughly until every cube is coated; uncovered spots will dry out rather than brown.
- Preheat the air fryer: Set your air fryer to 400°F (200°C) for about 3 to 5 minutes. Starting with a hot basket prevents the squash from sticking to the bottom.
- Load the basket: Place the seasoned squash in the air fryer basket. Do not overcrowd the basket beyond a single layer if possible. If the cubes are piled too high, they will steam instead of crisp.
- Air fry the squash: Cook at 400°F for 12 to 15 minutes. At the halfway mark, shake the basket firmly to redistribute the cubes. Look for the edges to turn a golden-brown color.
- Check for tenderness: Pierce a cube with a fork. It should slide in easily with no resistance. If the edges are brown but the center is still firm, add 2 more minutes of cooking time.
- Rest and serve: Remove the squash from the basket and let it sit for 2 minutes. This allows the remaining heat to finish softening the centers before serving.
1Use these techniques to refine the texture and flavor of your dish.
- ●2Cut uniform sizes: Use a ruler or a steady eye to ensure all cubes are the same size to avoid some being burnt while others are raw.
- ●3Avoid over-oiling: Too much oil can make the squash greasy and prevent the edges from getting truly crisp.
- ●4Shake frequently: Shaking the basket every 5 minutes ensures the hot air reaches all surfaces of the cubes.
- ●5Use a parchment liner: If you struggle with sticking, a perforated air fryer liner can help, though direct contact with the basket usually yields crispier results.
- ●6Dry the squash: If the squash feels damp after cutting, pat the cubes dry with a paper towel before adding oil.
Delicious Variations |
You can easily adapt this recipe to fit different flavor profiles or dietary needs.
- ●Maple Glazed: Toss the cooked squash in a mixture of maple syrup and cinnamon for a dessert-like side.
- ●Parmesan Crust: Sprinkle grated parmesan cheese over the cubes during the last 3 minutes of cooking.
- ●Spicy Kick: Add a pinch of cayenne pepper or smoked paprika to the initial seasoning mix.
- ●Herb Roasted: Toss with fresh chopped rosemary or thyme immediately after removing from the air fryer.
- ●Honey Garlic: Drizzle with a blend of honey and minced garlic for a sweet and pungent glaze.
These variations allow you to use the same base technique for different meals throughout the season.
Best Ways to Serve |
This versatile vegetable works as a side or a primary component of a larger dish.
- ●As a side for roasted chicken, pork chops, or baked salmon.
- ●Folded into a grain bowl with quinoa, spinach, and a tahini dressing.
- ●Tossed into a Butternut Squash Kale Caesar Salad Recipe Delight for added texture.
- ●Mixed into an Irresistible Butternut Squash Cranberry Lentil Stuffing for a hearty autumn meal.
For a more substantial meal, serve the squash over a bed of whipped feta or Greek yogurt. The creamy base balances the caramelized sweetness of the roasted cubes.
You can also use the leftover cubes to blend into a Roasted Butternut Squash And Pumpkin Soup A Golden Autumn Classic Healthy Fall Soup, adding a deeper roasted flavor to the broth.
Storage and Leftovers |
Refrigerating
Store leftover squash in an airtight container in the refrigerator for up to 4 days. Ensure the squash is completely cooled before sealing to prevent condensation from making the cubes soggy.
Reheating
To maintain the crispiness, reheat the squash in the air fryer at 350°F for 3 to 5 minutes. Microwave reheating is faster but will result in a softer, steamed texture.
Freezing
Flash freeze the cubes on a baking sheet before transferring them to a freezer bag. They will stay fresh for up to 3 months. Thaw in the fridge overnight before reheating in the air fryer.
Frequently Asked Questions |
- ●Q: Can I use pre-cut butternut squash from the store?A: Yes, you can use pre-cut squash. However, be aware that some store-bought versions are frozen or treated with preservatives. Ensure the cubes are patted dry with a paper towel before oiling to ensure they crisp up rather than steaming.
- ●Q: Why is my squash mushy instead of crispy?A: Mushiness usually happens because the air fryer basket was overcrowded. When cubes overlap too much, steam gets trapped between them. Cooking in smaller batches or shaking the basket more frequently allows the air to circulate and dry the surfaces.
- ●Q: Do I need to peel the butternut squash?A: While the skin of butternut squash is technically edible, it is very tough and waxy. For the best eating experience and to allow the oil to penetrate the flesh, peeling the skin is highly recommended.
- ●Q: Can I use a different type of squash?A: You can use acorn squash or honeynut squash with this method. Acorn squash is firmer and takes slightly longer, while honeynut is sweeter and may brown faster. Adjust the cooking time based on how the edges look.
- ●Q: How do I know when the squash is fully cooked?A: The squash is done when the edges are a deep golden brown and a fork or knife slides into the center of the largest cube without any resistance. The texture should be soft but not collapsing.
Why This Recipe Belongs in Your Weekly Rotation |
Integrating this dish into your routine simplifies the process of eating more vegetables. The speed of the air fryer removes the barrier of long preparation times, making it easy to add a nutrient-dense side to any meal.
It is a cost-effective way to use seasonal produce. Butternut squash is typically affordable during the fall and winter, and this recipe makes the most of its natural flavors without requiring expensive ingredients.
The versatility of the result means you can change the flavor profile weekly. One night it can be a savory side for an Effortless Butternut Squash Sausage Casserole Recipe, and the next it can be a sweet addition to a breakfast bowl.
Final Thoughts |
This air fryer butternut squash recipe provides a practical way to achieve caramelized, tender vegetables without the long wait of an oven. -heat circulation and simple seasoning, you get a professional roast result in minutes.
The combination of speed, ease, and flavor makes this a reliable tool for any home cook. It turns a humble winter squash into a standout side dish that complements a wide variety of proteins and grains.
Bring a taste of autumn into your kitchen tonight and enjoy the satisfying crunch of perfectly roasted squash.
Crispy Air Fryer Butternut Squash
- Total Time: 25 minutes
- Yield: 4 servings 1x
Description
Quick and easy air fried butternut squash cubes with caramelized edges and a tender interior. A healthy, fast alternative to oven roasting.
Ingredients
- 2 cups butternut squash, peeled and cut into 1-inch cubes
- 1 tablespoon olive oil
- 1/2 teaspoon salt
- 1/4 teaspoon black pepper
- 1/2 teaspoon garlic powder
Instructions
- Peel the butternut squash and cut the flesh into uniform 1-inch cubes.
- In a large bowl, toss the squash cubes with olive oil, salt, black pepper, and garlic powder until evenly coated.
- Preheat the air fryer to 400°F (200°C) for 3-5 minutes.
- Place the seasoned squash in the air fryer basket in a single layer.
- Air fry at 400°F for 12-15 minutes, shaking the basket halfway through the cooking time.
- Check that the squash is golden brown and tender when pierced with a fork.
- Allow the squash to rest for 2 minutes before serving.
- Prep Time: 10 minutes
- Cook Time: 15 minutes
- Category: Side Dish
- Method: Air Frying
- Cuisine: American