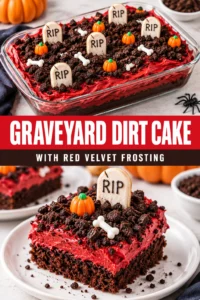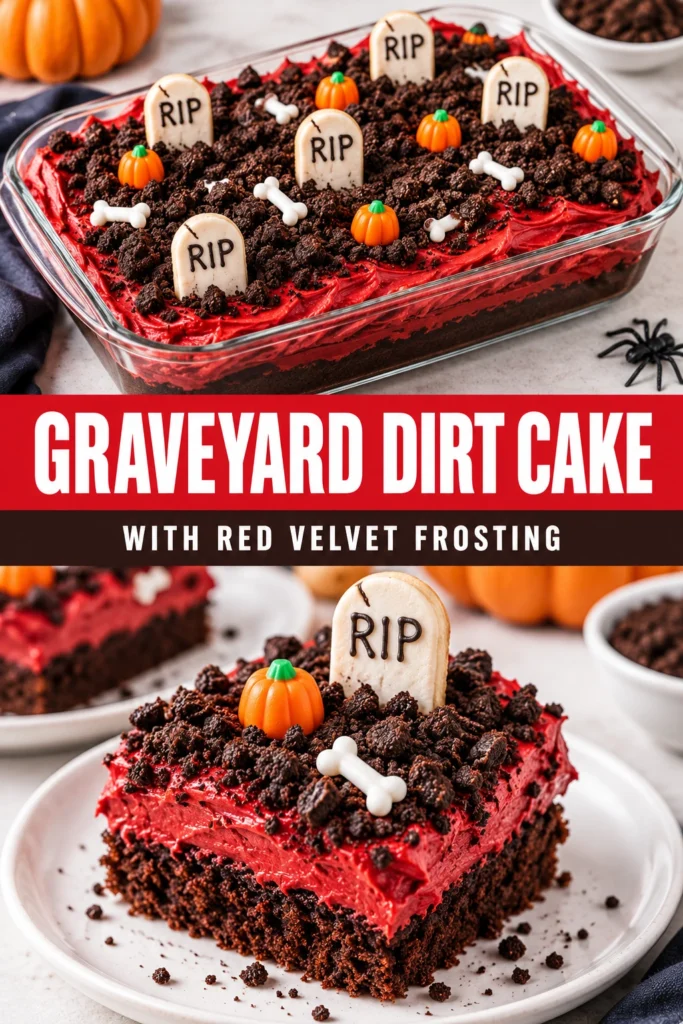
This dessert swaps the standard white cream base for a striking crimson layer, creating a high-contrast visual that mimics a theatrical scene. The deep, dark cocoa crumbs act as a textured soil, grounding the brightness of the frosting.
A graveyard dirt cake is a layered pudding dessert designed to look like garden earth, topped with edible markers and treats. It relies on a mix of creamy textures and crunchy elements to keep every bite interesting.
Most versions use a plain vanilla or chocolate pudding base, but the addition of red velvet frosting introduces a tangy, cream-cheese profile. This shift adds a sophisticated flavor depth that balances the sweetness of the candy toppings.
The stark difference between the blood-red frosting and the obsidian-dark crumbs makes this a centerpiece choice. It provides a more modern aesthetic than the traditional Oreo-and-pudding combinations.
This recipe is an ideal choice for hosting a costume party where guests expect themed treats. It can be assembled in a large glass trifle bowl to show off the layers or in a wide baking dish for a traditional look.
The following guide explains how to build these layers for maximum stability and visual impact.
- ●Why You’ll Love This Recipe
- ●A Brief Background on the Flavor Profile
- ●Perfect For Halloween Parties and Spooky Gatherings
- ●The Role of Cocoa Crumbs
- ●The Red Velvet Element
- ●Key Ingredients
- ●How to Make It
- ●Pro Tips
- ●Creative Variations
- ●Best Ways to Serve
- ●Storage and Leftovers
- ●Frequently Asked Questions
- ●Why This Recipe Belongs in Your Seasonal Rotation
- ●Final Thoughts
This dessert balances visual drama with a flavor profile that appeals to both children and adults.
- ●The red velvet frosting adds a tangy contrast to the rich chocolate.
- ●The texture alternates between silky pudding and gritty cocoa crumbs.
- ●It requires no actual baking, reducing time spent at the oven.
- ●The presentation is naturally striking without needing professional skills.
- ●Ingredients are widely available at most grocery stores.
- ●It can be prepared a day in advance to allow flavors to meld.
- ●The layering technique makes it a great project for kids to help with.
- ●It pairs well with other spooky treats like Indulge In Black Velvet Halloween Cake Spooky Delicious
Combining these elements results in a dessert that tastes as bold as it looks.
A Brief Background on the Flavor Profile |
The traditional dirt cake uses a combination of instant pudding and whipped topping to create a mousse-like consistency. velvet flavors, the recipe borrows from the classic pairing of cocoa and cream cheese, which is a staple in many red velvet variations.
The cocoa crumbs provide a bitter edge that cuts through the sugar of the pudding. This interaction is what prevents the dessert from becoming overly cloying, ensuring that the palate remains refreshed throughout the meal.
Because the components are chilled rather than baked, the flavors remain bright and distinct. The cold temperature enhances the creaminess of the red velvet layer, making it feel like a decadent cheesecake filling.
Perfect For Halloween Parties and Spooky Gatherings |
This dessert fits seamlessly into an October menu. Its ability to be made in large batches makes it suitable for crowds, whether you are hosting a neighborhood block party or a small family get-together.
For those planning a themed event, this dish serves as a focal point. It occupies less space than a full cake while providing a similar level of impact. It is also a safer alternative for those who prefer chilled desserts over heavy, baked cakes.
When preparing for a holiday rush, the no-bake nature of this recipe allows you to focus on other preparations. You can set the cake in the refrigerator and forget about it until the moment guests arrive.
The Role of Cocoa Crumbs |
Chocolate sandwich cookies provide the essential earthy texture. When crushed, they create a granular appearance that convincingly mimics soil, while adding a deep, roasted cocoa scent to the dish.
The fat content in the cookie cream prevents the crumbs from absorbing too much moisture from the pudding. This ensures that the “dirt” stays somewhat distinct rather than turning into a uniform paste over time.
The Red Velvet Element |
Cream cheese frosting serves as the vibrant heart of this recipe. The lactic acid in the cheese provides a sharp tang that brightens the entire dessert, while the red coloring provides the necessary visual shock.
Using a cream cheese base instead of a butter-based frosting allows the layer to remain stable at refrigerated temperatures. This prevents the red layer from bleeding into the chocolate layers, maintaining the clean lines of the graveyard design.
Key Ingredients |
Each component is chosen to contribute a specific sensory element to the final assembly.
- ●Chocolate sandwich cookies — provides a dark, crunchy texture and deep cocoa flavor.
- ●Instant chocolate pudding — creates a smooth, creamy base with a sweet aroma.
- ●Cold milk — hydrates the pudding to a thick, spreadable consistency.
- ●Cream cheese — adds a salty, tangy richness and structure to the frosting.
- ●Butter — contributes a smooth mouthfeel and subtle richness to the cream.
- ●Powdered sugar — sweetens the frosting and gives it a matte, opaque finish.
- ●Red food coloring — imparts a vivid, striking crimson hue.
- ●Gummy worms — adds a chewy texture and a playful, creepy visual element.
How to Make It |
Precision in the layering process is the key to achieving the graveyard look without the colors muddling.
- Prepare the cocoa soil: Pulse chocolate sandwich cookies in a food processor until they resemble coarse sand. Avoid over-processing them into a fine powder, as the grit is necessary for the realistic dirt appearance.
- Mix the pudding base: Whisk the instant chocolate pudding mix with cold milk until the lumps disappear. Let the mixture sit for five minutes to fully set; this prevents the pudding from leaking into the cookie layers.
- Whip the red velvet frosting: Beat softened cream cheese and butter together until the mixture is pale and smooth. Gradually add powdered sugar and red food coloring, beating on low speed to avoid incorporating too much air, which could make the frosting unstable.
- Establish the first layer: Spread a generous layer of the crushed cookies at the bottom of your dish. Press them down lightly with a spoon to create a firm foundation that won’t shift when you add the wet ingredients.
- Add the creamy center: Pour the set chocolate pudding over the cookie base. Smooth the top with a spatula to ensure an even surface, which helps the subsequent layers stay level.
- Apply the red velvet layer: Carefully spoon the red velvet frosting over the pudding. Use an offset spatula to create a smooth, flat surface. If the frosting is too stiff, stir it briefly to loosen it before spreading.
- Top with the final soil: Cover the red frosting with another thick layer of cookie crumbs. This hides the red center until the first scoop is taken, creating a surprise effect for the guests.
- Decorate the graveyard: Press gummy worms into the crumbs and insert rectangular cookies or fudge pieces to act as tombstones. Ensure the decorations are pushed deep enough into the soil so they don’t tip over.
1Small adjustments in temperature and technique can significantly improve the final result.
- ●2Chill your bowl: Using a cold mixing bowl for the frosting helps the butter and cream cheese maintain their structure.
- ●3Sift the sugar: Pass the powdered sugar through a fine-mesh strainer to remove clumps, which prevents tiny white spots in the red frosting.
- ●4Use full-fat ingredients: Full-fat cream cheese and whole milk provide a denser, more stable structure that holds up better during serving.
- ●5Wait to decorate: Add the gummy worms and tombstones just before serving to prevent the moisture from the cake from softening the candies.
- ●6Room temperature fats: Ensure the butter and cream cheese are truly softened to avoid streaks in the red velvet layer.
Creative Variations |
Depending on the occasion or dietary needs, you can alter the core components of the dish.
- ●White Chocolate Twist: Substitute the chocolate pudding for white chocolate and use dark cocoa cookies for a monochromatic look.
- ●Fruit Integration: Add a layer of fresh raspberries between the pudding and frosting to enhance the red theme and add tartness.
- ●Dairy-Free Option: Use coconut cream and vegan cream cheese substitutes for a plant-based version.
- ●Mocha Infusion: Stir a teaspoon of instant espresso powder into the pudding mix to deepen the chocolate notes.
- ●Seasonal Swap: Replace red frosting with orange for a pumpkin-themed dirt cake, pairing it with a Peach Cake Recipe Easy Brown Sugar Frosting For Perfect Summer Dessert Summer Cake for a late-summer transition.
These changes allow the recipe to adapt to different flavor preferences while keeping the visual appeal intact.
Best Ways to Serve |
The presentation of this dessert is as important as the taste. Choosing the right vessel determines how the layers are showcased.
- ●Glass Trifle Bowl: This is the best option if you want to display the red and chocolate stripes.
- ●Individual Mason Jars: Create mini-graveyards for a more controlled, portable serving size.
- ●Wide Ceramic Baking Dish: Ideal for a classic “garden” look where the toppings are the main focus.
When serving, use a wide spoon or a cookie scoop to get a cross-section of all three layers in one bite. This ensures the guest experiences the transition from crunchy soil to creamy frosting.
Pair this dessert with a strong coffee or a tart beverage. The acidity of a cold-brew coffee or a cranberry spritzer balances the richness of the cream cheese and chocolate.
Storage and Leftovers |
Refrigerating
Store the assembled cake in an airtight container in the refrigerator for up to 4 days. The layers will merge slightly over time, but the flavors will deepen.
Reheating
This is a chilled dessert and should not be reheated. If it has become too firm, let it sit at room temperature for 10 minutes before serving.
Freezing
The pudding and cream cheese layers do not freeze well and may separate upon thawing. It is recommended to keep this recipe refrigerated rather than frozen.
Frequently Asked Questions |
- ●Q: Can I use homemade pudding instead of the instant variety?A: While homemade pudding is possible, it requires a cooking and cooling process that can introduce too much moisture into the cookie layers. Instant pudding provides a more stable, thick consistency that prevents the red velvet frosting from sliding off the base.
- ●Q: How do I prevent the red frosting from bleeding into the pudding?A: Ensure the chocolate pudding is fully set and cold before adding the frosting. If the pudding is still warm or too thin, the red pigment will migrate downward. Using a spatula to create a clean boundary helps maintain the separation.
- ●Q: What can I use as tombstones if I don’t have rectangular cookies?A: You can use cubes of fudge, slices of apple, or even pieces of white chocolate. The goal is to find something sturdy enough to stand upright in the cookie crumbs without sinking or tipping over during the party.
- ●Q: Is there a way to make the red color more intense without adding more dye?A: Using a gel-based food coloring rather than a liquid version provides a much more concentrated pigment. Gel colors do not alter the consistency of the frosting, meaning you can achieve a deep crimson without making the cream cheese too runny.
- ●Q: Can this recipe be made for a crowd in a larger pan?A: Yes, you can double or triple the ingredients to fit a 9×13 inch pan. Just ensure you maintain the ratio of the layers so that the red velvet frosting remains a distinct middle layer and does not get lost.
Why This Recipe Belongs in Your Seasonal Rotation |
The appeal of this dessert lies in its duality. It satisfies the craving for a rich, decadent cake while remaining light enough to serve as a party treat. It removes the stress of baking, allowing you to focus on the creative side of food presentation.
Integrating the red velvet element elevates it above the standard dirt cake found in most cookbooks. It introduces a professional flavor profile—the tang of cream cheese and the depth of cocoa—that feels intentional and curated.
Whether you are looking for a way to impress guests or a fun activity to do with children, this recipe provides a reliable result. It transforms simple pantry staples into a visual experience that fits the mood of the season.
Final Thoughts |
This graveyard dirt cake blends a dark cocoa base with a vivid red velvet center, creating a dessert that is both visually striking and flavor-balanced. The combination of creamy pudding and crunchy cookies provides a satisfying textural contrast.
Bring a touch of theatrical flair to your next gathering bold, crimson-centered treat.
Graveyard Dirt Cake with Red Velvet Frosting
- Total Time: 30 minutes
- Yield: 8 servings 1x
Description
A no-bake layered dessert featuring chocolate cookie crumbs, chocolate pudding, and a vibrant red velvet cream cheese frosting, decorated to look like a spooky graveyard.
Ingredients
- 24 oz chocolate sandwich cookies, crushed
- 1 package (3.9 oz) instant chocolate pudding mix
- 3 cups cold whole milk
- 8 oz cream cheese, softened
- 1/2 cup unsalted butter, softened
- 3 cups powdered sugar
- 1 tsp vanilla extract
- Red gel food coloring
- 1 pack gummy worms
- 6–8 rectangular cookies for tombstones
Instructions
- Pulse the chocolate sandwich cookies in a food processor until they resemble coarse soil. Set aside.
- Whisk the instant chocolate pudding mix with cold milk in a bowl until smooth. Let it sit for 5 minutes to set.
- In a separate bowl, beat the softened cream cheese and butter together until fluffy.
- Gradually add powdered sugar and vanilla extract to the cream cheese mixture, beating on low speed.
- Add red gel food coloring to the frosting until a deep crimson color is achieved.
- Spread 1/3 of the cookie crumbs into the bottom of a glass bowl or baking dish.
- Pour the chocolate pudding over the crumb layer and smooth the surface.
- Spread the red velvet frosting evenly over the pudding layer.
- Top with the remaining cookie crumbs to cover the red frosting completely.
- Decorate by pressing gummy worms into the crumbs and inserting rectangular cookies upright as tombstones.
- Refrigerate for at least 2 hours before serving to set the layers.
- Prep Time: 30 minutes
- Cook Time: 0 minutes
- Category: Dessert
- Method: No-Bake
- Cuisine: American