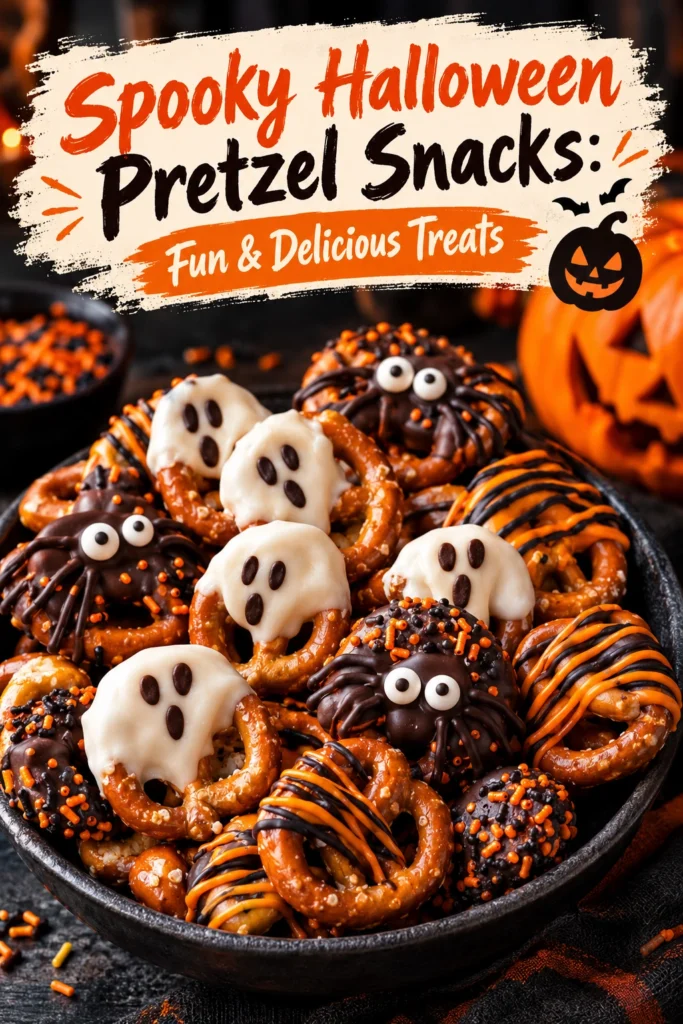
A satisfying crunch followed by a wave of creamy milk chocolate and a hint of salt defines these spooky snacks. The contrast between the rigid pretzel and the smooth coating creates an addictive texture that appeals to all ages.
These treats are modified pretzel rods, transformed into ghosts, monsters, and mummies using a variety of candies and melted chocolate. They provide a visual centerpiece for any October gathering without requiring hours of kitchen labor.
Many people love these snacks because they balance the sweet and salty profiles perfectly. The salty base prevents the chocolate from becoming overly cloying, making it easier to eat several in one sitting.
Unlike store-bought coated pretzels, these homemade versions allow you to control the quality of the chocolate and the creativity of the decorations. You can customize the themes to match your specific party decorations.
This recipe is ideal for parents looking for a kid-friendly activity or hosts who need a quick addition to a dessert table. They pair beautifully with other themed sweets like Spooky Halloween Cookies Recipe Fun Creepy Treats
The process is straightforward and requires very little actual cooking. Here is everything you need to get started.
- ●Why You’ll Love This Recipe
- ●A Brief Background on the Flavor Profile
- ●Perfect For Parties and Family Activities
- ●Main Ingredient Spotlight: Pretzel Rods
- ●Secondary Ingredient Spotlight: Melting Chocolate
- ●Key Ingredients
- ●How to Make It
- ●Pro Tips
- ●Delicious Variations
- ●Best Ways to Serve
- ●Storage and Leftovers
- ●Frequently Asked Questions
- ●Why This Recipe Belongs in Your Weekly Rotation
- ●Final Thoughts
These snacks are more than just food; they are a craft project that ends in a delicious reward. The versatility of the ingredients makes them a crowd-pleaser.
- ●Minimal cleanup since most of the work happens on a single baking sheet.
- ●Fast preparation time that doesn’t require an oven for the assembly.
- ●A perfect balance of salt and sugar to satisfy different cravings.
- ●Highly customizable themes including ghosts, skeletons, and monsters.
- ●Cost-effective ingredients that are available at any local grocery store.
- ●Great for engaging children in the kitchen with safe decorating tasks.
- ●Visually striking presentation that adds a professional look to party platters.
- ●Stable at room temperature for several hours during an event.
This combination of ease and visual appeal makes these pretzels a staple for seasonal entertaining.
A Brief Background on the Flavor Profile |
The success of this snack relies on the classic pairing of salt and chocolate. Salt acts as a flavor enhancer, brightening the notes of the cocoa and preventing the sugar from tasting flat.
Adding various toppings like candy eyes or orange sprinkles introduces different textures, from the chewiness of gelatin-based candies to the crisp snap of sugar pearls.
These treats bridge the gap between a light snack and a full dessert, making them a flexible addition to any menu.
Perfect For Parties and Family Activities |
These snacks are ideal for high-energy Halloween parties where guests prefer finger foods over plated desserts. Since they are handheld, they allow guests to mingle while they eat.
They also serve as an excellent meal-prep option for school classrooms or office celebrations. You can assemble them a few days in advance and store them securely.
During the holidays, these act as a great bridge between savory appetizers and heavy cakes. They offer a lighter alternative to something like a Delightful Halloween Cookie Cake Spooky Delicious Treats Easy Halloween Dessert
Main Ingredient Spotlight: Pretzel Rods |
Pretzel rods provide the essential structural integrity for the treat. Their straight shape makes them easy to dip and stand up as figures, while the baked dough offers a deep, toasted flavor that anchors the sweetness of the toppings.
Secondary Ingredient Spotlight: Melting Chocolate |
The chocolate serves as both the flavor coating and the edible glue for the decorations. Using a high-quality melting chocolate ensures a smooth, glossy finish that doesn’t streak or separate during the dipping process.
The richness of the cocoa complements the saltiness of the pretzel, creating a velvety mouthfeel that lingers after each bite.
Key Ingredients |
Gather these items to ensure the decorating process goes smoothly without interruptions.
- ●Pretzel Rods — These provide the salty crunch and the base structure for the characters.
- ●White Chocolate — This creates the bright base for ghosts and mummies.
- ●Milk Chocolate — This adds a rich, classic cocoa flavor for monsters and spiders.
- ●Candy Eyes — These small sugar decorations bring the characters to life with an instant facial expression.
- ●Orange Sprinkles — These add pops of seasonal color and a slight textural contrast.
- ●Candy Melts — These are used for detailed piping, such as mummy bandages or monster mouths.
How to Make It |
Follow these steps to create a variety of spooky characters with a professional finish.
- Prepare the workstation: Line a baking sheet with parchment paper or wax paper. This prevents the chocolate from sticking to the pan, which would cause the decorations to tear when you try to move the pretzels.
- Melt the chocolate: Place chocolate chips or melting wafers in a microwave-safe bowl. Heat in 30-second intervals, stirring between each session to prevent the chocolate from scorching or seizing.
- Dip the pretzels: Hold a pretzel rod and dip it into the melted chocolate, rotating it to ensure an even coating. Leave a small portion of the bottom exposed so the “character” has a place to stand or be held.
- Set the base: Place the coated rod carefully onto the parchment paper. If the chocolate is too thin, you may see the pretzel through the coating; if so, let it set for a minute and apply a second coat.
- Add the facial features: While the chocolate is still wet, press candy eyes into the top of the rod. Doing this immediately ensures the eyes adhere firmly and do not slide off once the chocolate hardens.
- Pipe the details: Melt a small amount of contrasting chocolate (such as white chocolate over milk chocolate) in a piping bag or plastic bag with the corner snipped. Pipe lines for mummy wraps or zig-zags for monster teeth.
- Apply final accents: Sprinkle orange or purple sugar pearls onto the wet chocolate. This adds a festive shimmer and a bit of extra sweetness to the salty base.
- Harden the treats: Allow the pretzels to sit at room temperature for 30 minutes or place them in the fridge for 10 minutes. This ensures the decorations are locked in place before serving.
1Use these techniques to achieve a cleaner look and better taste.
- ●2Avoid water contact: Ensure all bowls and spatulas are completely dry, as a single drop of water can cause melted chocolate to seize and become clumpy.
- ●3Temperature control: If the chocolate is too hot, it will run off the pretzel; if it is too cool, it will leave lumps. Aim for a consistency similar to thick syrup.
- ●4Use a fork: Use a fork to lift the pretzels out of the chocolate. This allows the excess to drip off, preventing a thick, uneven pool of chocolate at the bottom.
- ●5Steady the rods: If you want them to dry perfectly upright, poke the bottom of the pretzel into a piece of styrofoam or a cardboard box with small holes.
- ●6Layering colors: Let the first color dry completely before piping a second color on top to keep the lines sharp and prevent the colors from bleeding into each other.
Delicious Variations |
You can easily adapt this recipe to fit different dietary needs or flavor preferences.
- ●Dark Chocolate Base: Swap milk chocolate for dark chocolate (70% cocoa) for a more sophisticated, less sweet treat.
- ●Peanut Butter Dip: Melt white chocolate with a tablespoon of creamy peanut butter for a salty-sweet nut butter flavor.
- ●Vegan Option: Use dairy-free chocolate chips and vegan candy eyes to make these accessible for everyone.
- ●Caramel Layer: Dip the pretzel in melted caramel before the chocolate for an extra layer of gooey sweetness.
- ●Autumn Spice: Stir a pinch of cinnamon or pumpkin pie spice into the melted white chocolate for a seasonal aroma.
These adjustments allow you to create a diverse platter that caters to various tastes while maintaining the spooky theme.
Best Ways to Serve |
Presentation is key for Halloween treats. Arrange these pretzels on a platter to create a visual story.
- ●The Graveyard Platter: Stand the pretzels upright in a shallow tray filled with crushed chocolate cookies to look like soil.
- ●The Mixed-Treat Board: Pair these with Spooky Halloween Rice Crispy Treats Recipe Fun Easy Easy Halloween Treats for a variety of textures.
- ●Individual Treat Bags: Place two pretzels in a clear cellophane bag with a orange ribbon for party favors.
For a larger party, group the characters by type—ghosts in one section and monsters in another. This makes the display look organized and intentional.
Serving these alongside a beverage like apple cider or a pumpkin latte completes the seasonal experience.
Storage and Leftovers |
Refrigerating
Store the pretzels in an airtight container in the refrigerator for up to 7 days. This keeps the chocolate crisp and prevents the candy eyes from softening.
Reheating
Do not reheat these treats. Applying heat will melt the chocolate decorations and ruin the visual appeal. Serve them chilled or at room temperature.
Freezing
These can be frozen for up to 3 weeks. Wrap them individually in parchment paper and place them in a freezer bag to avoid condensation, which can cause the chocolate to bloom (turn white).
Frequently Asked Questions |
- ●Q: Why did my chocolate turn grainy after melting?A: This usually happens because the chocolate overheated or a small amount of moisture entered the bowl. To fix this, avoid using the microwave on high for long periods and ensure all equipment is bone-dry before you start.
- ●Q: Can I use regular chocolate bars instead of melting wafers?A: Yes, you can use chocolate bars, but they contain cocoa butter which can make the coating thinner. You may need to add a teaspoon of coconut oil to help the chocolate flow more smoothly over the pretzel.
- ●Q: How do I stop the candy eyes from sliding off?A: The secret is timing. You must press the eyes into the chocolate while it is still in a liquid state. If the chocolate has already set, you can use a tiny dot of melted chocolate as glue.
- ●Q: Do I need to use a piping bag for the details?A: A professional piping bag is helpful but not necessary. A simple Ziploc bag with a very small corner cut off works perfectly for piping mummy bandages or small monster mouths on the pretzels.
- ●Q: What is the best way to prevent chocolate from sticking to the pan?A: Always use parchment paper or a silicone baking mat. Avoid using aluminum foil, as the chocolate can sometimes stick to the metal, causing your carefully crafted characters to lose their features when lifted.
Why This Recipe Belongs in Your Weekly Rotation |
While these are themed for Halloween, the basic technique of dipping pretzels in chocolate is a timeless skill. Once you master this process, you can adapt it for Valentine’s Day, Christmas, or simple after-school snacks.
The low effort required makes this a sustainable choice for busy households. It provides a way to engage with family members in a creative activity without the stress of a complex baking project.
Integrating these salty-sweet treats into your routine ensures you always have a quick, impressive snack ready for guests. It is a reliable way to bring a bit of joy and creativity into the kitchen.
Final Thoughts |
These spooky pretzel snacks combine the crunch of a salty pretzel with the sweetness of melted chocolate and whimsical decorations. They are an easy, visually appealing treat that requires no oven time and minimal ingredients.
Whether you are hosting a large party or looking for a simple activity to do with children, these treats offer the perfect balance of fun and flavor. They are customizable, cost-effective, and consistently delicious.
Grab some pretzels and chocolate today to bring these hauntingly tasty treats to your table!
Spooky Halloween Pretzel Snacks: Fun & Delicious Treats
- Total Time: 20 minutes
- Yield: 12 pretzels 1x
Description
Fun and spooky chocolate-covered pretzel rods decorated as ghosts and monsters. A perfect blend of salty and sweet for Halloween parties.
Ingredients
- 12 large pretzel rods
- 1 cup white chocolate melting wafers
- 1 cup milk chocolate melting wafers
- 12–24 candy eyes
- 2 tbsp orange sugar sprinkles
- 1/2 cup orange or purple candy melts for detailing
Instructions
- Line a baking sheet with parchment paper to prevent sticking.
- Melt white chocolate in a microwave-safe bowl in 30-second intervals, stirring until smooth.
- Dip 6 pretzel rods into the white chocolate, leaving the bottom inch exposed.
- Place the white chocolate rods on the parchment paper and immediately press two candy eyes onto the top to create ghosts.
- Melt milk chocolate in a separate bowl using the same 30-second interval method.
- Dip the remaining 6 pretzel rods into the milk chocolate and place them on the parchment paper.
- Add candy eyes and orange sprinkles to the milk chocolate rods to create monsters.
- Melt the candy melts and pipe mummy bandages or monster mouths onto the rods using a small piping bag.
- Allow the treats to set at room temperature for 30 minutes or in the fridge for 10 minutes before serving.
- Prep Time: 20 minutes
- Cook Time: 0 minutes
- Category: Dessert
- Method: No-Bake
- Cuisine: American