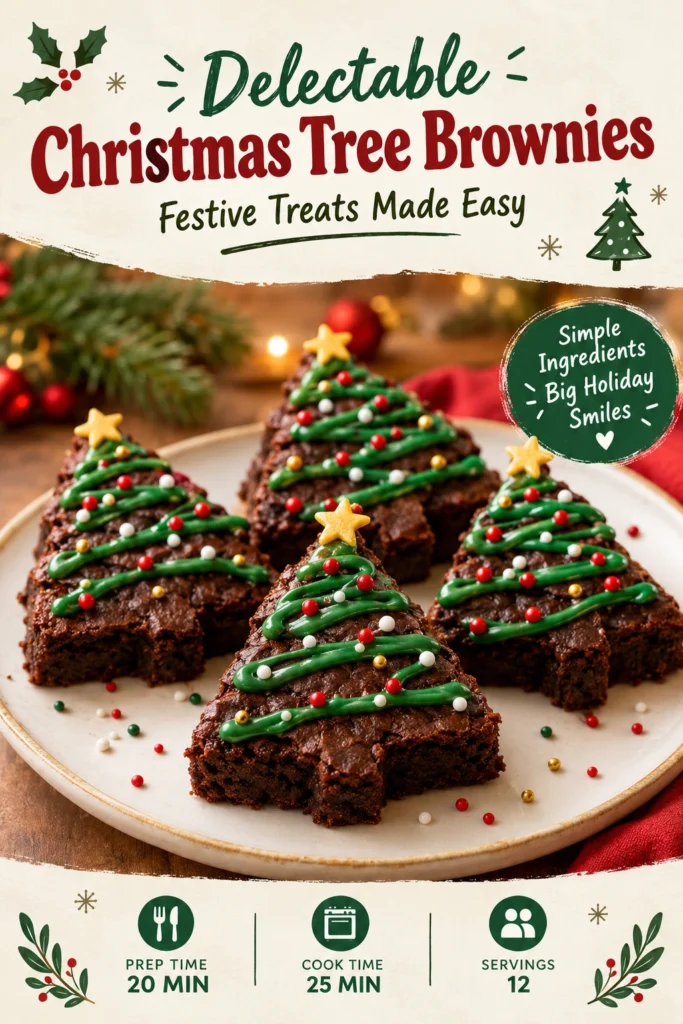
These brownies stand out from the standard square tray because they transform a chocolate classic into a visual centerpiece. The structured tree shape adds a playful element to any dessert table.
This recipe features a deep cocoa base paired with a bright, peppermint-infused buttercream frosting. The contrast of rich chocolate and cool mint defines the flavor profile.
Home bakers love these treats because they combine the comfort of a fudgy brownie with the excitement of holiday decorating. They are as satisfying to look at as they are to eat.
Unlike store-bought holiday cookies that often taste overly processed, these are made with real butter and high-quality chocolate for a dense, chewy texture.
These brownies are perfect for parents baking with children or anyone looking to impress at a neighborhood cookie exchange. The process is straightforward and rewarding.
Follow these detailed steps to create a batch of holiday sweets that look professional but remain simple to execute.
- ●Why You’ll Love This Recipe
- ●A Brief Background / Why This Recipe Works
- ●Perfect For Holiday Parties and Gift Boxes
- ●Main Ingredient Spotlight: Cocoa Powder
- ●Secondary Ingredient Spotlight: Buttercream Frosting
- ●Key Ingredients
- ●How to Make It
- ●Pro Tips
- ●Delicious Variations
- ●Best Ways to Serve
- ●Storage and Leftovers
- ●Frequently Asked Questions
- ●Why This Recipe Belongs in Your Weekly Rotation
- ●Final Thoughts
This dessert balances the intensity of dark chocolate with the lightness of festive decorations, making it a crowd-pleasing option for all ages.
- ●The tree shape creates an immediate festive atmosphere on any platter.
- ●Fudgy textures provide a more luxurious feel than cake-like brownies.
- ●Customizable frosting colors allow you to match any holiday theme.
- ●The recipe uses common pantry staples, reducing the need for special trips to the store.
- ●Individual portions make them easy to serve without messy slicing.
- ●They pair exceptionally well with coffee or hot cocoa.
- ●The decorating process is a great activity for kids.
- ●They hold their shape well, making them suitable for transport to parties.
- ●The minty notes in the frosting cut through the richness of the chocolate.
- ●They offer a professional look with minimal technical skill required.
This combination of ease and visual impact makes these brownies a reliable choice for high-stress holiday seasons.
A Brief Background / Why This Recipe Works |
The success of this recipe lies in the ratio of fat to flour. flour content low and the butter and chocolate content high, the brownies maintain a dense, fudgy consistency that supports the weight of the frosting without collapsing.
The use of a specific cutting technique allows the brownies to be arranged into a triangle, mimicking the silhouette of a pine tree. This geometric approach turns a simple sheet cake into an artistic display.
Temperature control during the frosting stage prevents the green buttercream from melting or sliding off the chocolate base. Chilling the brownies before decorating provides a stable surface for the piping bag.
These treats fit perfectly alongside 25 Festive Holiday Treats And Christmas Classics for a complete dessert spread.
Perfect For Holiday Parties and Gift Boxes |
These brownies are an excellent choice for holiday parties because they serve as both a dessert and a decoration. Their sturdy structure means they can be plated and moved around a room without falling apart.
For those who enjoy meal prepping their holiday treats, these can be baked in advance and frosted on the day of the event. This saves time when the house is full of guests.
They also work well for family dinners where a themed dessert is desired but time is limited. Since they use a single pan for baking, cleanup is fast and efficient.
If you are preparing 25 Festive Christmas Treats And Holiday Recipes, these brownies provide a rich, chocolatey anchor to the variety.
Main Ingredient Spotlight: Cocoa Powder |
Cocoa powder provides the intense, bittersweet foundation of the brownie. Unlike melted chocolate alone, cocoa powder concentrates the chocolate flavor without adding excess fat, which helps achieve that characteristic fudgy bite. If cocoa powder is omitted, the brownies will lack the deep color and punchy chocolate taste, resulting in a bland, buttery cake.
Secondary Ingredient Spotlight: Buttercream Frosting |
Buttercream acts as the “needles” of the Christmas tree. Its stability allows it to be piped into peaks or swirls that maintain their height. The sugar in the frosting balances the bitterness of the cocoa. Without this frosting, the brownies would remain simple squares, losing the festive tree appearance and the necessary sweetness to contrast the dark chocolate.
Key Ingredients |
Each component plays a specific role in creating the texture and flavor of these holiday treats.
- ●Unsalted Butter — Provides the richness and moisture needed for a chewy texture.
- ●Granulated Sugar — Creates the classic crackly top and sweetness.
- ●Eggs — Bind the ingredients together and provide structure.
- ●Cocoa Powder — Delivers the primary deep chocolate flavor.
- ●All-Purpose Flour — Adds just enough structure to prevent the brownie from becoming a truffle.
- ●Vanilla Extract — Enhances the chocolate notes and adds aromatic warmth.
- ●Powdered Sugar — Forms the base of the smooth, pipeable frosting.
- ●Heavy Cream — Adjusts the consistency of the frosting for better piping.
- ●Green Food Coloring — Transforms the frosting into a festive evergreen hue.
- ●Rainbow Sprinkles — Mimic holiday ornaments for the final touch.
How to Make It |
Follow these steps carefully to ensure the brownies are fudgy and the tree shape is precise.
- Prepare the pan: Grease an 8×8 inch baking pan and line it with parchment paper. The parchment allows you to lift the entire block of brownies out for easier cutting.
- Melt the butter: Heat the butter in a microwave or on the stove until liquid but not boiling. Melted butter ensures the brownie is dense rather than airy.
- Combine sugar and butter: Stir the granulated sugar into the melted butter. This helps the sugar dissolve, contributing to a smoother texture and a glossy top.
- Add wet ingredients: Beat in the eggs and vanilla extract one at a time. Adding eggs individually prevents the batter from breaking and ensures a uniform emulsion.
- Sift in dry ingredients: Gently fold in the cocoa powder and flour using a spatula. Avoid overmixing at this stage, as too much air will make the brownies cakey instead of fudgy.
- Bake the brownies: Pour the batter into the pan and bake at 350F (175C) for 20-25 minutes. Look for edges that are set but a center that still has a slight jiggle; overbaking leads to dryness.
- Cool completely: Let the brownies cool in the pan for at least two hours or refrigerate them. Attempting to cut or frost warm brownies will cause the frosting to melt and the shapes to crumble.
- Cut the tree shapes: Lift the brownies out of the pan. Cut the slab into a large triangle, then trim the sides into tiered sections to create the tree silhouette.
- Prepare the frosting: Beat powdered sugar, butter, and heavy cream until fluffy. Stir in the green food coloring until the shade is vibrant and consistent.
- Pipe the decorations: Use a star tip to pipe small dollops of frosting across the tree. The star tip creates the illusion of pine needles.
- Add ornaments: Press sprinkles into the wet frosting. Do this immediately so the sprinkles adhere to the buttercream.
1Use these techniques to elevate the quality and appearance of your holiday brownies.
- ●2Use room temperature eggs: This prevents the melted butter from seizing, resulting in a smoother batter.
- ●3Underbake slightly: Pull the pan from the oven when a toothpick comes out with a few moist crumbs. They will firm up as they cool.
- ●4Chill the base: Placing the brownies in the fridge for 30 minutes before cutting creates perfectly clean edges.
- ●5Use a piping bag: A pastry bag with a small star tip provides much cleaner results than using a knife or spoon.
- ●6Sift the cocoa: Cocoa powder often clumps; sifting it prevents dark lumps from appearing in the finished brownie.
Delicious Variations |
You can adapt this recipe to suit different tastes or dietary preferences with these simple changes.
- ●Peppermint Twist: Add a drop of peppermint extract to the frosting for a candy-cane flavor.
- ●White Chocolate Accents: Use white chocolate chips as “snow” on the branches of the tree.
- ●Gluten-Free Option: Substitute the all-purpose flour with a 1:1 gluten-free flour blend.
- ●Double Chocolate: Fold semi-sweet chocolate chips into the batter for extra richness.
- ●Nutty Base: Add finely chopped walnuts or pecans to the batter for added crunch.
These variations allow you to customize the treats for different guests while keeping the festive tree look.
Best Ways to Serve |
Presentation is key for these visually driven treats. Arrange them on a white platter to make the green frosting pop.
- ●Serve alongside a glass of cold milk for a classic pairing.
- ●Place them on a dessert board with fresh strawberries and raspberries.
- ●Pair with a hot cup of peppermint tea or coffee.
- ●Arrange them in a circle around a small bowl of whipped cream.
For a party, you can place a small piece of parchment paper under each brownie to make them easy for guests to pick up without plates.
If you are serving these at a larger gathering, consider pairing them with other treats like Easy Festive Christmas Tree Cupcakes Holiday Delight or Festive Christmas Cakesicles 5 Flavorful Treats To Delight
Storage and Leftovers |
Refrigerating
Store frosted brownies in an airtight container in the refrigerator for up to 5 days. The cold temperature keeps the buttercream stable and the brownie fudgy.
Reheating
Avoid reheating frosted brownies in the microwave, as the frosting will melt. If you prefer a warmer brownie, scrape the frosting off first and heat the base for 10 seconds.
Freezing
Freeze unfrosted brownies for up to 3 months tightly in plastic wrap and foil. Thaw overnight in the fridge before frosting and decorating.
Frequently Asked Questions |
- ●Q: How do I stop the brownies from sticking to the pan?A: Lining the pan with parchment paper is the most effective method. Ensure the paper extends over the sides of the pan, creating a sling that allows you to lift the entire block of brownies out without any residue left behind.
- ●Q: Can I use a different color of frosting?A: Yes, you can use red frosting for a poinsettia look or white for a snowy winter theme. The technique remains the same regardless of the color choice; just ensure the food coloring is well-incorporated into the buttercream.
- ●Q: Why did my brownies turn out cakey instead of fudgy?A: This usually happens due to overmixing the batter or using too much flour. Stir the flour in gently and stop as soon as it is incorporated to prevent excess air from entering the mixture during the baking process.
- ●Q: Can I use margarine instead of butter?A: While you can use margarine, butter provides a superior flavor and a more traditional fudgy texture. Margarine may result in a slightly greasier brownie and a less rich taste in the final product.
- ●Q: How do I fix frosting that is too runny to pipe?A: If the buttercream is too soft, add more powdered sugar one tablespoon at a time and beat again. If the room is very warm, refrigerate the frosting for 15 minutes to firm up the butter before piping.
Why This Recipe Belongs in Your Weekly Rotation |
While these are themed for the holidays, the base brownie recipe is a timeless staple. Having a reliable, fudgy chocolate dessert in your repertoire simplifies hosting and satisfying sweet cravings throughout the year.
The versatility of the base means you can swap the tree shapes for squares or hearts during other seasons. It is a high-reward recipe that uses basic ingredients to produce professional results.
Integrating this into your baking routine ensures you always have a go-to treat that impresses guests. The combination of rich cocoa and custom frosting makes it a flexible option for any celebration.
Final Thoughts |
These Christmas Tree Brownies combine a dense, chocolatey core with a vibrant, festive presentation. They are a simple way to bring holiday cheer to the table without spending hours in the kitchen.
The balance of flavors and the joy of decorating make this an ideal project for the winter season. Whether for a party or a quiet night in, these treats deliver a satisfying experience.
Grab your mixing bowl and start crafting these festive delights to brighten your holiday celebrations.
Delectable Christmas Tree Brownies: Festive Treats Made Easy
- Total Time: 55 minutes
- Yield: 12-16 brownies 1x
Description
Rich, fudgy chocolate brownies cut into festive tree shapes and decorated with vibrant green buttercream frosting and colorful sprinkles.
Ingredients
- 1/2 cup unsalted butter, melted
- 1 cup granulated sugar
- 2 large eggs
- 1 tsp vanilla extract
- 1/3 cup unsweetened cocoa powder
- 1/2 cup all-purpose flour
- 1/4 tsp salt
- 1 cup unsalted butter, softened
- 3 cups powdered sugar
- 2 tbsp heavy cream
- Green food coloring
- Rainbow sprinkles
Instructions
- Preheat oven to 350F (175C). Grease an 8×8 inch baking pan and line with parchment paper.
- Stir granulated sugar into the melted butter until combined.
- Beat in eggs and vanilla extract one at a time.
- Sift in cocoa powder, flour, and salt. Gently fold in until just combined.
- Pour batter into the pan and bake for 20-25 minutes until the edges are set.
- Allow brownies to cool completely in the pan, then refrigerate for 30 minutes.
- Lift brownies out and cut into a large triangle, trimming the sides to form a tiered tree shape.
- Beat softened butter and powdered sugar together, adding heavy cream and green food coloring until fluffy.
- Pipe small star-shaped dollops of frosting across the brownies using a star tip.
- Press rainbow sprinkles into the frosting to create ornament decorations.
- Prep Time: 30 minutes
- Cook Time: 25 minutes
- Category: Dessert
- Method: Baking
- Cuisine: American