The marshmallows begin to soften and stretch into a glossy, molten pool as they melt into the butter. This transformation creates the sticky binder that turns dry cereal into a chewy, cohesive treat.
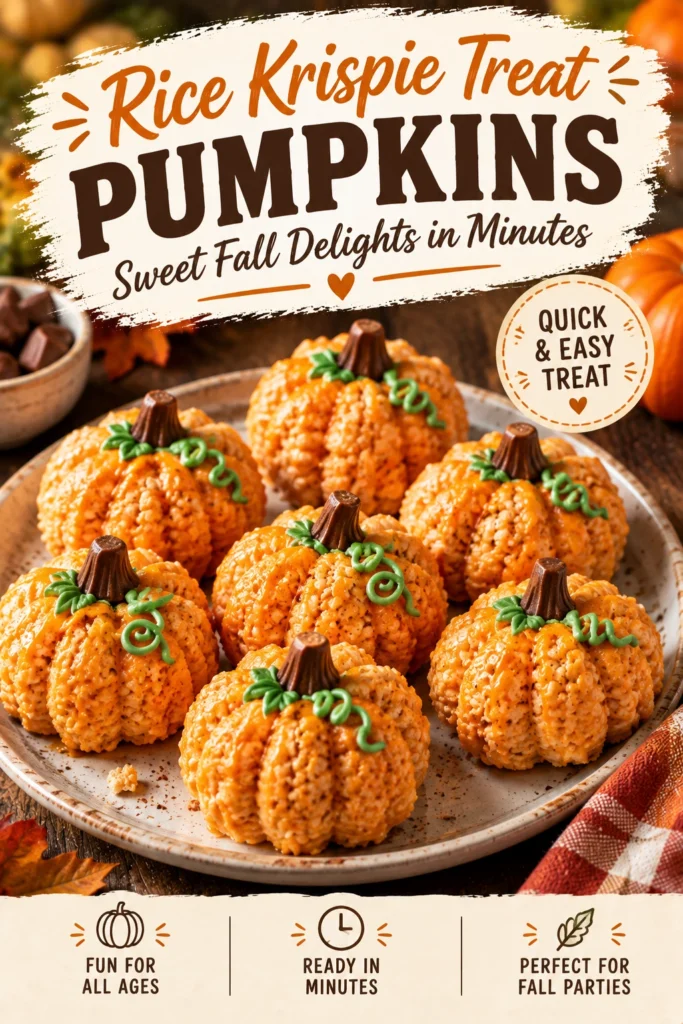
These Rice Krispie Treat Pumpkins take the classic childhood snack and reshape it into festive autumn decor. By adding a touch of orange coloring and a simple stem, a standard treat becomes a seasonal centerpiece.
Many people appreciate this recipe because it requires no oven time and uses ingredients already found in most cupboards. The result is a snack that feels special without requiring hours of effort.
Unlike store-bought treats that often feel overly hard or artificial, these homemade versions stay soft and buttery. You can control the sweetness and the intensity of the color to suit your preference.
Parents and party hosts will find these particularly useful for school events or holiday gatherings. They are easy for children to help with and always disappear quickly from the platter.
Pairing these with a No Bake Pumpkin Cheesecake creates a cohesive dessert spread for any October celebration.
Follow the guide below to master the texture and shape of these orange delights.
- ●Why You’ll Love This Recipe
- ●A Brief Background on Why This Recipe Works
- ●Perfect For Festive Fall Gatherings
- ●Main Ingredient Spotlight: Crisped Rice Cereal
- ●Secondary Ingredient Spotlight: Marshmallows
- ●Key Ingredients
- ●How to Make It
- ●Pro Tips
- ●Delicious Variations
- ●Best Ways to Serve
- ●Storage and Leftovers
- ●Frequently Asked Questions
- ●Why This Recipe Belongs in Your Weekly Rotation
- ●Final Thoughts
These pumpkin treats combine simplicity with a high visual impact, making them a favorite for those who want professional-looking results with minimal stress.
- ●Quick assembly time means you spend less time in the kitchen.
- ●No baking is required, keeping the kitchen cool.
- ●The pumpkin shape adds a whimsical touch to any dessert table.
- ●Common pantry ingredients keep the cost very low.
- ●The texture is a perfect balance of crunch and chew.
- ●Customizable colors allow for different autumn hues.
- ●Portion control is easy since you mold them individually.
- ●They are stable at room temperature for several hours.
- ●Kid-friendly preparation steps encourage family involvement.
These treats provide an immediate way to bring the spirit of the season into your home through taste and presentation.
A Brief Background on Why This Recipe Works |
The success of this recipe relies on the interaction between the fat in the butter and the sugar in the marshmallows. When heated together, they create a syrup that coats every piece of cereal, preventing the treats from becoming too dry or crumbling.
Using a specific shaping method ensures the pumpkins maintain their round form without flattening out. Greasing the hands or the mold prevents the sticky mixture from clinging to surfaces, allowing for a clean release.
The addition of orange food coloring happens while the marshmallows are molten, which ensures the color is evenly distributed throughout the batch rather than streaky.
This balance of ingredients results in a treat that holds its shape for decoration but remains soft enough to bite into easily.
Perfect For Festive Fall Gatherings |
These treats are ideal for Halloween parties where a themed dessert is necessary but time is limited. Their bright color and recognizable shape fit perfectly alongside other spooky sweets like Indulge In Vampire Fudge
They also work well for school bake sales or classroom parties because they are easy to transport and do not require refrigeration. The individual portions make them hygienic and convenient for guests to grab.
For family movie nights during October, these provide a themed snack that is more exciting than a standard bowl of popcorn. They can be made in large batches to feed a crowd without requiring multiple cooking sessions.
Main Ingredient Spotlight: Crisped Rice Cereal |
Crisped rice cereal provides the essential structural foundation and the signature crunch. Because the cereal is light and airy, it allows the marshmallow mixture to penetrate deep into the grains, ensuring that no part of the treat is tasteless.
The neutral flavor of the rice cereal acts as a canvas, allowing the buttery sweetness of the binder to shine. It also keeps the treats from feeling too heavy, which is important when they are shaped into dense little pumpkins.
Secondary Ingredient Spotlight: Marshmallows |
Marshmallows act as the glue that holds the entire treat together. When melted, they turn into a stretchy, sugary syrup that creates the chewy consistency most people associate with these snacks.
The sugar content in the marshmallows also aids in the setting process. Once they cool, the syrup firms up just enough to keep the pumpkin shape intact while remaining pliable enough to chew.
Key Ingredients |
Gather these basic components to begin your festive baking project.
- ●Butter — provides richness and prevents the marshmallow from becoming too sticky.
- ●Marshmallows — creates the sweet, chewy binder for the cereal.
- ●Crisped Rice Cereal — adds the light, crunchy texture.
- ●Orange Food Coloring — gives the treats their signature pumpkin hue.
- ●Green Candy or Pretzels — used to create the stem at the top of each pumpkin.
- ●Vanilla Extract — enhances the overall flavor profile with a warm aroma.
How to Make It |
Follow these steps carefully to ensure your pumpkins are shaped correctly and have the right consistency.
- Melt the butter: Place the butter in a large pot over low heat. Use low heat to avoid browning the butter, as you want a clean, creamy base for the marshmallow mixture.
- Dissolve the marshmallows: Add the marshmallows to the melted butter and stir constantly. Keep the heat low to prevent the sugar from scorching, which can lead to a bitter taste and a grainy texture.
- Add flavor and color: Stir in the vanilla extract and the orange food coloring once the marshmallows are fully melted. Mix thoroughly until the color is uniform and there are no white streaks remaining.
- Fold in the cereal: Pour the crisped rice cereal into the pot and fold it in gently with a spatula. Stir until every piece of cereal is completely coated in the orange mixture, taking care not to crush the cereal.
- Prepare for shaping: Grease your hands with a small amount of butter or cooking spray. This is a critical step to prevent the mixture from sticking to your skin as you mold the shapes.
- Mold the pumpkins: Scoop about a handful of the mixture and roll it into a tight ball. Gently flatten the bottom so the pumpkin sits steady, and use your fingers to create slight vertical indentations around the sides to mimic a real pumpkin.
- Insert the stems: Press a small piece of green candy or a tiny pretzel fragment into the top center of each pumpkin. Do this immediately while the mixture is still warm so the stem adheres securely.
- Cool and set: Place the pumpkins on a parchment-lined baking sheet and let them sit at room temperature for about 30 minutes. Do not refrigerate them immediately, as this can make the texture too hard.
1Use these techniques to elevate the quality of your treats and make the process smoother.
- ●2Avoid overcooking: Remove the marshmallow mixture from the heat the moment the last lump disappears to keep the treats soft.
- ●3Use a silicone mat: Placing treats on a silicone mat or parchment paper prevents them from sticking to the counter.
- ●4Work quickly: Shape the pumpkins while the mixture is warm, as it becomes much harder to mold once it cools.
- ●5Measure accurately: Use a measuring cup for the cereal to ensure the ratio of marshmallow to rice is balanced.
- ●6Test the color: Add food coloring one drop at a time until you reach the desired shade of orange.
Delicious Variations |
While the classic orange pumpkin is a hit, you can tweak the ingredients for different results.
- ●White Pumpkin: Omit the food coloring for a sophisticated white pumpkin look, perfect for a modern fall theme.
- ●Pumpkin Spice Twist: Add a half-teaspoon of pumpkin pie spice to the melted butter for an authentic autumn flavor.
- ●Chocolate Drizzle: Melt dark chocolate and drizzle it over the finished pumpkins for added decadence.
- ●Nutty Crunch: Mix in some finely chopped pecans or walnuts along with the cereal for a savory contrast.
- ●Colored Variety: Use yellow or red coloring to create a variety of autumn gourds.
These adjustments allow you to tailor the treats to your specific flavor preferences or the color palette of your event.
Best Ways to Serve |
Presentation makes these treats even more appealing for guests and children.
- ●Arrange them on a wooden platter with dried autumn leaves for a rustic look.
- ●Serve them in a basket lined with a plaid napkin for a cozy vibe.
- ●Pair them with other fall sweets like Apple Pie Cookies
- ●Place them on a tiered dessert stand to add height to your table.
For a full dessert spread, consider offering a creamy contrast. These chewy treats go exceptionally well with a light dip, similar to the flavors found in an Easy Caramel Apple Cheesecake Dip
If serving at a party, place a small card next to the platter identifying the treat to make the spread feel more professional.
Storage and Leftovers |
Refrigerating
Store the pumpkins in an airtight container in the refrigerator for up to 5 days. Note that refrigeration can make them slightly firmer than room temperature storage.
Reheating
If the treats have become too hard, place one in the microwave for 5 to 10 seconds. This softens the marshmallow without melting the shape entirely.
Freezing
Wrap each pumpkin individually in plastic wrap and place them in a freezer bag for up to 3 months. Thaw them at room temperature before serving.
Frequently Asked Questions |
- ●Q: Why are my Rice Krispie pumpkins too hard to bite?A: This usually happens if the marshmallow mixture is overcooked on the stove. When sugar is heated too long, it reaches a higher temperature that creates a brittle, hard texture once cooled. Stick to low heat and remove the pot from the burner as soon as the marshmallows are smooth.
- ●Q: How can I prevent the pumpkins from sticking to my hands?A: The best method is to lightly grease your palms with unsalted butter or a neutral cooking spray before you start shaping. This creates a thin barrier between your skin and the sticky sugar, allowing you to roll the balls smoothly without the mixture pulling away.
- ●Q: Can I use a different cereal instead of crisped rice?A: Yes, you can use corn puffs or other puffed grains, but the texture will change. Crisped rice is preferred because its small size makes it easier to mold into a tight, round pumpkin shape without the treat crumbling or having large gaps.
- ●Q: Do I need to use a specific type of food coloring?A: Gel food coloring is recommended because it provides a more intense color without adding extra liquid to the recipe. If you only have liquid coloring, start with a few drops and be careful not to add too much, as too much liquid can make the binder runny.
- ●Q: My pumpkins are flattening out; how do I fix this?A: This occurs if the mixture is too warm when you set it down or if you didn’t pack the cereal tightly enough during the rolling process. Ensure you squeeze the ball firmly in your palm and let them cool on a flat surface without touching them.
- ●Q: Can I make these in advance for a party?A: Absolutely, you can make them a day or two in advance. Keep them in a sealed container at room temperature to maintain that classic chewy consistency. If you live in a very humid environment, an airtight container is essential to keep them from getting sticky.
Why This Recipe Belongs in Your Weekly Rotation |
These treats provide a low-stress way to incorporate seasonal joy into your home. Because they use basic staples, you can whip up a batch whenever a craving for something sweet and nostalgic hits.
The versatility of the recipe means it can evolve with the seasons. While orange is perfect for October, you can easily shift the colors to match other holidays or events throughout the year.
Ultimately, the combination of a fast preparation time and a crowd-pleasing result makes this a reliable choice for any home cook. It is a simple pleasure that brings a smile to both children and adults.
Final Thoughts |
Rice Krispie Treat Pumpkins are a delightful blend of buttery sweetness and festive presentation. They take a familiar snack and transform it into a seasonal highlight using only a few simple steps.
Whether you are preparing for a themed party or just want a cozy autumn snack, these treats are a manageable and rewarding project. They offer a great way to get the whole family involved in the kitchen.
Grab your marshmallows and cereal to start creating these orange autumn delights today.
Rice Krispie Treat Pumpkins: Sweet Fall Delights in Minutes
- Total Time: 25 minutes
- Yield: 12 pumpkins 1x
Description
A festive, no-bake twist on classic rice cereal treats shaped like pumpkins. These chewy, buttery snacks are perfect for autumn parties and kid-friendly baking.
Ingredients
- 3 tablespoons unsalted butter
- 10 ounces mini marshmallows
- 6 cups crisped rice cereal
- 1 teaspoon vanilla extract
- Orange food coloring
- 12 small green candies or pretzel bits for stems
Instructions
- Melt the butter in a large pot over low heat until completely liquid.
- Add the mini marshmallows to the butter and stir constantly until smooth and melted.
- Stir in the vanilla extract and orange food coloring until the color is uniform.
- Fold in the crisped rice cereal using a spatula until every piece is coated.
- Grease your hands with butter to prevent sticking.
- Scoop a handful of mixture and roll into a ball, flattening the bottom slightly.
- Press vertical indentations into the sides to create a pumpkin shape.
- Insert a green candy or pretzel piece into the top for the stem.
- Let the pumpkins set on parchment paper for 30 minutes before serving.
- Prep Time: 15 minutes
- Cook Time: 10 minutes
- Category: Dessert
- Method: No-Bake
- Cuisine: American