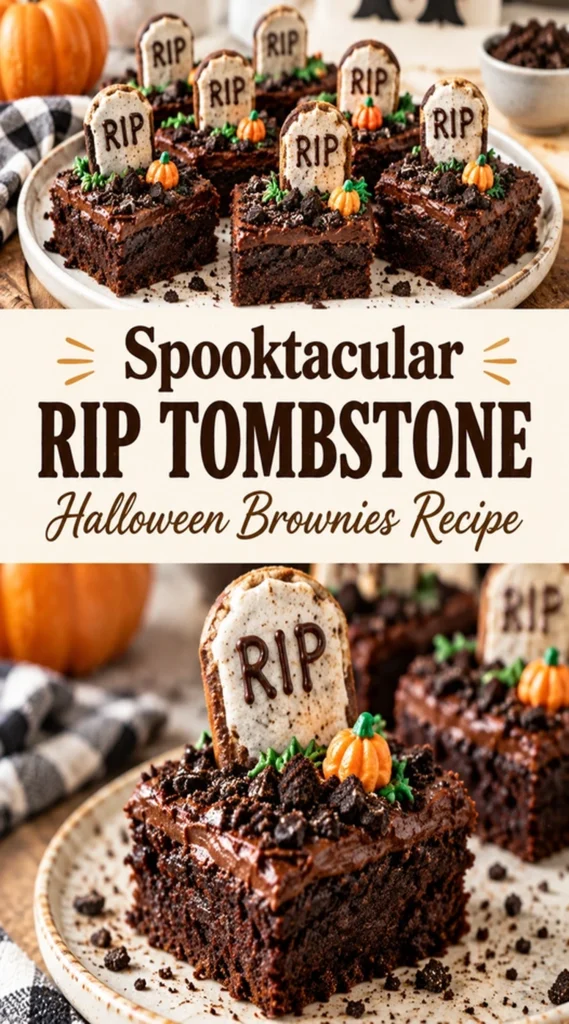
Deep cocoa and salty butter create a fudgy base that balances the sweetness of the decorative toppings. This combination allows the rich chocolate to stand out while providing a sturdy structure for the tombstone decorations.
These RIP Tombstone Brownies are dense, chewy chocolate squares topped with grey-tinted cookies and a crushed cookie “dirt” layer. The contrast between the dark brownie and the pale grey tombstones makes them a visual centerpiece for any spooky spread.
Guests love the interactive look of the graveyard scene, which turns a standard dessert into a thematic experience. The texture remains moist and indulgent, avoiding the cakey consistency of many store-bought options.
Unlike pre-packaged Halloween treats, these brownies allow for control over the chocolate quality and sweetness levels. The homemade nature of the batter results in a more intense cocoa flavor.
Parents and party hosts find these ideal because they can be prepared in advance and are easy to slice into uniform portions. They pair well with other thematic sweets like Create Spooktacular Halloween Swirl Brownies Today
The process is straightforward and involves a few simple assembly steps once the brownies have cooled. Follow the guide below to build your own edible cemetery.
- ●Why You’ll Love This Recipe
- ●A Brief Background on the Design
- ●Perfect For Halloween Parties and Spooky Gatherings
- ●Main Ingredient Spotlight: Cocoa Powder
- ●Secondary Ingredient Spotlight: Butter
- ●Key Ingredients
- ●How to Make It
- ●Pro Tips
- ●Delicious Variations
- ●Best Ways to Serve
- ●Storage and Leftovers
- ●Frequently Asked Questions
- ●Why This Recipe Belongs in Your Weekly Rotation
- ●Final Thoughts
Creating a themed dessert often feels overwhelming, but this recipe simplifies the process a few high-impact visual cues.
- ●Rich, fudgy texture that appeals to chocolate lovers of all ages.
- ●Visual appeal that transforms a basic brownie into a graveyard scene.
- ●Minimal ingredients for the decorations using common pantry staples.
- ●Can be made a day in advance to save time during party prep.
- ●Easy to customize the “RIP” lettering with different icing colors.
- ●Sturdy enough to hold the tombstone cookies without sinking.
- ●Works well as a platter center-piece or individual handheld treats.
- ●Balanced sweetness that isn’t overly sugary.
- ●Fast prep time for the batter, leaving more time for decorating.
The result is a dessert that tastes as professional as it looks, ensuring your guests are impressed effort and the flavor.
A Brief Background on the Design |
The aesthetic of this recipe relies on layering. By using a dark brownie base and topping it with crumbled chocolate cookies, the dish mimics the look of freshly turned earth in a cemetery.
The tombstones are created using rectangular cookies or pieces of shortbread. Tinting these grey or leaving them a pale cream color creates the necessary contrast against the dark “dirt” layer.
Using a piping bag or a small plastic bag with the corner snipped off allows for precise lettering. The simplicity of writing “RIP” makes it accessible for those who are not experienced with cake decorating.
This design method provides a scalable way to create many treats quickly while maintaining a consistent spooky theme across the entire batch.
Perfect For Halloween Parties and Spooky Gatherings |
These brownies are ideal for themed events where a visual “wow” factor is needed without requiring hours of professional decorating. They fit naturally on a dessert table alongside items like Indulge In Luscious Halloween Cheesecake Brownies Recipe Spooky Dessert Idea
For family-oriented gatherings, this recipe serves as a fun activity. Children can help crush the cookies for the dirt or help place the tombstone cookies onto the squares.
During the busy holiday season, the ability to bake the brownies in a single pan and slice them later makes this an efficient choice for meal planning. They are portable and hold up well during transport to school or community parties.
Main Ingredient Spotlight: Cocoa Powder |
Cocoa powder provides the deep, dark color necessary for the “earth” effect. Because it is concentrated, it delivers a potent chocolate flavor without adding the excessive fat found in some melted chocolate bars.
Using a high-quality Dutch-processed cocoa powder results in a darker, more neutral flavor that looks more like soil. Natural cocoa powder is slightly more acidic and lighter in color, which may slightly alter the visual theme.
Secondary Ingredient Spotlight: Butter |
Butter is the primary fat source that creates the fudgy, dense texture. It prevents the brownies from becoming cakey and provides a rich mouthfeel that balances the bitterness of the cocoa.
Using unsalted butter allows for precise control over the salt levels. A pinch of salt is essential to enhance the chocolate notes and prevent the dessert from tasting flat.
When melted, butter incorporates easily with sugar to create a smooth batter that bakes evenly across the pan.
Key Ingredients |
Each component plays a specific role in achieving the final texture and appearance of the graveyard brownies.
- ●Butter — provides moisture and a rich, fudgy consistency.
- ●Sugar — sweetens the batter and helps create the crackly top crust.
- ●Eggs — bind the ingredients together and provide structure.
- ●Cocoa Powder — creates the intense chocolate flavor and dark color.
- ●Flour — gives the brownies enough stability to be sliced and topped.
- ●Vanilla Extract — adds a layer of aromatic depth to the chocolate.
- ●Chocolate Sandwich Cookies — used for the crumbled dirt and the tombstone shapes.
- ●Grey Icing — used for the RIP lettering and tombstone shading.
How to Make It |
Follow these steps carefully to ensure the brownies are fudgy enough to support the decorations but firm enough to cut.
- Prepare the pan and oven: Preheat your oven to 350°F (175°C). Grease an 8×8 inch baking pan or line it with parchment paper, leaving an overhang on the sides. This allows for easy removal of the entire block of brownies once cooled.
- Melt the fats and sugar: Combine butter and sugar in a microwave-safe bowl or a saucepan over low heat. Stir until the butter is completely melted and the sugar is incorporated. Avoid overheating the butter to the point where it separates.
- Incorporate the wet ingredients: Whisk in the eggs one at a time, followed extract. Mix until the batter looks glossy and smooth. Over-mixing at this stage can introduce too much air, which leads to a cakey rather than fudgy brownie.
- Fold in the dry ingredients: Sift the cocoa powder and flour into the wet mixture. Use a spatula to fold the dry ingredients in gently until no streaks of flour remain. Stop mixing as soon as the batter is uniform to maintain the dense texture.
- Bake until set: Pour the batter into the prepared pan and smooth the top. Bake for 20 to 25 minutes. The brownies are ready when the edges are slightly pulled away from the sides and a toothpick inserted into the center comes out with a few moist crumbs. If the toothpick is clean, they are overbaked.
- Cool completely: Let the brownies cool in the pan for at least an hour. Attempting to decorate warm brownies will melt the icing and cause the cookie tombstones to slide. For the cleanest cuts, chill the pan in the refrigerator for 30 minutes.
- Create the cemetery scene: Slice the brownies into squares. Spread a thin layer of frosting or melted chocolate on top of each square to act as glue. Press crushed chocolate cookies over the top to create a dirt layer.
- Add the tombstones: Take rectangular cookies or halves of sandwich cookies and press them vertically into the “dirt.” Use grey icing to pipe “RIP” on the cookies. Let the decorations set for 15 minutes before serving.
1Applying these small adjustments can elevate the quality and appearance of your Halloween treats.
- ●2Use a parchment sling: Line the pan with parchment paper that extends over the edges. This lets you lift the entire slab out of the pan for perfectly straight cuts with a sharp knife.
- ●3Chill before slicing: Placing the baked brownies in the fridge for an hour before cutting prevents the fudgy center from sticking to the blade.
- ●4Sift the cocoa: Cocoa powder is prone to clumping. Sifting it ensures there are no bitter pockets of dry powder in the finished brownies.
- ●5Control the crumb: For the dirt layer, pulse cookies in a food processor for a fine powder, or crush them a more chunky, realistic soil look.
- ●6Steady the tombstones: If the cookies won’t stay upright, use a small dot of stiff royal icing at the base of the cookie to anchor it to the brownie.
Delicious Variations |
While the classic chocolate version is a hit, these adaptations can change the flavor profile or accommodate different tastes.
- ●Peanut Butter Grave: Swirl peanut butter into the batter before baking for a salty-sweet contrast.
- ●Minty Cemetery: Add a teaspoon of peppermint extract to the batter for a refreshing twist.
- ●White Chocolate Ghosts: Use white chocolate melts to pipe small ghosts around the tombstones.
- ●Salted Caramel Dirt: Drizzle salted caramel over the brownies before adding the cookie crumbles.
- ●Gluten-Free Option: Substitute the all-purpose flour with a 1:1 gluten-free flour blend and use gluten-free cookies for the decorations.
These changes allow you to tailor the recipe to your guests’ preferences while keeping the spooky visual theme intact.
Best Ways to Serve |
Presentation is key for themed desserts. Arrange the brownies on a large black or orange platter to make the colors pop.
- ●On a platter with a surrounding ring of candy corn for added color.
- ●Individually plated with a dollop of whipped cream to look like “fog.”
- ●As part of a larger spread featuring Tempting Spooky Monster Mash Brownies Recipe For Halloween
- ●Paired with a cold glass of milk or a spiced pumpkin latte.
For a more immersive experience, place a few plastic spiders or skeletons around the platter. This enhances the graveyard atmosphere and encourages guests to engage with the food.
Since these are rich and dense, serving them in small squares makes them easier to consume as part of a multi-dessert party. Ensure they are served at room temperature for the best flavor, though the decorations should be kept cool until serving.
Storage and Leftovers |
Refrigerating
Store the decorated brownies in an airtight container in the refrigerator for up to 5 days. Keeping them cold helps the icing remain set and prevents the brownies from drying out.
Reheating
Avoid reheating decorated brownies in the microwave as the icing and cookie tombstones will melt. If you prefer them warm, slice off the decorations first and heat the brownie base for 10 seconds.
Freezing
Freeze undecorated brownie squares wrapped in foil and stored in a freezer bag for up to 3 months. Thaw them in the refrigerator overnight before adding the dirt and tombstones.
Frequently Asked Questions |
- ●Q: Why are my brownies cakey instead of fudgy?A: Cakey brownies usually happen when too much air is beaten into the eggs or when the batter is over-mixed after adding the flour. To keep them fudgy, stir the dry ingredients in a spatula just until combined, and avoid using a hand mixer for the final steps.
- ●Q: Can I use a different type of cookie for the tombstones?A: Yes, any sturdy, rectangular cookie works well. Shortbread, vanilla wafers, or even pieces of a graham cracker can be used. The key is to ensure the cookie can stand vertically without snapping, and you can always use grey icing to cover the original color.
- ●Q: How do I stop the icing from bleeding into the cookie?A: Use a stiff icing like royal icing or a thick buttercream. If the icing is too runny, it will soak into the cookie and blur the “RIP” lettering. Ensure the cookies are completely cool and dry before you begin piping the letters.
- ●Q: What can I use if I don’t have a piping bag?A: A sturdy plastic freezer bag works perfectly. Fill the bag with icing, push it into one corner, and snip a very tiny piece off the tip. This allows you to control the flow of the icing for the lettering.
- ●Q: Can I make these without the cookie crumbles?A: You can, although you lose the soil effect. Instead, you could use a layer of chocolate ganache or a sprinkle of cocoa powder. However, the crushed cookies provide a necessary textural contrast that balances the softness of the brownie.
Why This Recipe Belongs in Your Weekly Rotation |
While heavily themed for October, the base of this recipe is a timeless chocolate brownie that works any time of year. Once you master the balance of cocoa and butter, you have a reliable dessert for birthdays, potlucks, or simple cravings.
The technique of using a “dirt” layer and a topper can be adapted for other themes, such as garden-themed desserts for spring or beach-themed treats using graham cracker sand. This makes the skill set gained from this recipe versatile across all seasons.
Offering a homemade alternative to store-bought treats reduces processed sugar intake and allows for higher-quality ingredients. It is a rewarding process that brings a bit of creativity back into the kitchen.
Final Thoughts |
These RIP Tombstone Brownies combine a rich, fudgy chocolate base with an imaginative cemetery design. cookies and piped tombstones, a simple bake becomes a striking Halloween centerpiece.
The process is designed to be stress-free, making it a great choice for those who want professional results without needing advanced pastry skills. They provide the perfect balance of flavor and spookiness for any party guest.
Gather your ingredients and bring this edible graveyard to life for your next spooky celebration.
Spooktacular RIP Tombstone Halloween Brownies Recipe
- Total Time: 45 minutes
- Yield: 16 squares 1x
Description
A rich, fudgy chocolate brownie base topped with a crumbled cookie ‘soil’ layer and grey-tinted cookie tombstones. Perfectly spooky and indulgent for Halloween celebrations.
Ingredients
- 1/2 cup unsalted butter, melted
- 1 cup granulated sugar
- 2 large eggs
- 1 teaspoon vanilla extract
- 1/3 cup unsweetened cocoa powder
- 1/2 cup all-purpose flour
- 1/4 teaspoon salt
- 1 cup crushed chocolate sandwich cookies
- 16 rectangular cookies (shortbread or vanilla)
- 1/4 cup grey-tinted royal icing
Instructions
- Preheat oven to 350°F (175°C) and grease an 8×8 inch pan or line it with parchment paper.
- Stir melted butter and sugar together in a bowl until combined.
- Whisk in eggs one at a time, then stir in the vanilla extract.
- Sift in cocoa powder, flour, and salt. Fold gently with a spatula until just combined.
- Pour batter into the pan and bake for 20-25 minutes, or until edges pull away from the pan.
- Cool completely in the pan for at least one hour, then chill in the fridge for 30 minutes.
- Slice the brownies into 16 squares.
- Top each square with a small amount of icing or melted chocolate, then press crushed cookies on top to look like dirt.
- Place a rectangular cookie vertically into the crumb layer on each square.
- Pipe 'RIP' onto each cookie using the grey icing.
- Prep Time: 20 minutes
- Cook Time: 25 minutes
- Category: Dessert
- Method: Baking
- Cuisine: American