The smell of toasted marshmallows bubbling in a pot always brings back memories of childhood magic. It is a scent that promises something sweet and sticky. That first batch I ever made felt like a science experiment gone right.
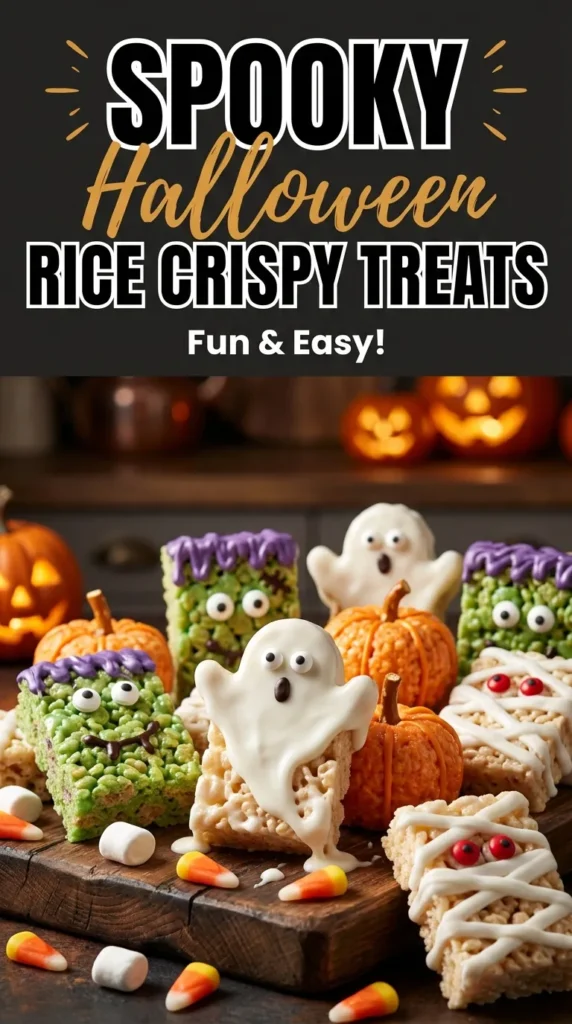
These Spooky Halloween Rice Crispy Treats are a whimsical twist on a nostalgic classic. They turn a simple snack into a festive centerpiece. The colors are vibrant and the textures are perfectly chewy.
Families love this recipe because it requires zero actual baking. It is a low-stress way to get everyone involved in the kitchen. Even the youngest helpers can add the spooky decorations.
What makes this version unique is the adventurous use of color and themed toppings. It transforms a plain square into a ghostly or monstrous creation. You can truly let your imagination run wild here.
Compared to store-bought versions, these are far more buttery and fresh. They lack the artificial aftertaste of mass-produced treats. The quality is immediately apparent in every bite.
This recipe is perfect for parents, teachers, or anyone hosting a haunt. It is a crowd-pleaser that scales easily for large groups. You will see smiles on every face.
Let us dive into the magical process of creating these sweets. You might also enjoy our Spooktacular Halloween Rice Crispy Treats Recipe Fun Dessert
- ●Why You’ll Love This Recipe
- ●A Brief Background / Why This Recipe Works
- ●Perfect For Spooky Family Celebrations
- ●Main Ingredient Spotlight: Marshmallows
- ●Secondary Ingredient Spotlight: Rice Cereal
- ●Key Ingredients
- ●How to Make It
- ●Pro Tips
- ●Delicious Variations
- ●Best Ways to Serve
- ●Storage and Leftovers
- ●Frequently Asked Questions
- ●Why This Recipe Belongs in Your Weekly Rotation
- ●Final Thoughts
There are countless reasons to make these treats, but the sheer joy they bring is the biggest one. They are visually striking and incredibly tasty.
- ●No oven required, which keeps the kitchen cool.
- ●Takes less than 30 minutes from start to finish.
- ●Easily customizable with different food colors.
- ●Perfect texture that is both crisp and chewy.
- ●Budget-friendly ingredients found in any grocery store.
- ●Kids can safely participate in the decorating phase.
- ●They hold their shape well for party platters.
- ●The sweetness level is perfectly balanced .
- ●Great for those who want a fast, high-impact dessert.
- ●They evoke a sense of nostalgic comfort.
Once you see how easy these are, you will want to make them every October. If you need more ideas, try Spooky Halloween Cookies Recipe Fun Creepy Treats
A Brief Background / Why This Recipe Works |
The chemistry of a rice crispy treat is actually quite fascinating. You are creating a sugar-based glue that binds airy cereal together. When the butter and marshmallows melt, they form a smooth, elastic syrup.
I almost gave up on this recipe until I realized I was overcooking the marshmallows. I had noticed they were becoming hard and brittle. Lowering the heat completely changed the game and kept them gooey.
The addition of food coloring happens at the precise moment the marshmallows are liquid. This ensures the color is distributed evenly without creating clumps. It turns the mixture into a vivid canvas for Halloween themes.
Ultimately, the balance of salt from the butter and sweetness from the sugar creates a crave-able profile. It is a simple formula that never fails to satisfy a sweet tooth.
Perfect For Spooky Family Celebrations |
These treats are a lifesaver for busy weeknights when a school party invite arrives at the last minute. You can whip up a batch in minutes. They are portable and sturdy enough for lunchboxes.
Meal prep is a breeze with these sweets. You can make them a day in advance and they stay fresh. This allows you to focus on the decorations and costumes on the big night.
Family dinner gatherings during the holidays benefit from a dessert that doesn’t require hours of labor. These are a hit with both children and adults. They add a playful element to the table.
Main Ingredient Spotlight: Marshmallows |
Marshmallows act as the structural heart of the recipe. Their gelatin-based composition allows them to melt into a sticky binder. When cooled, they provide that signature chewiness that everyone loves.
High-quality marshmallows ensure a smoother melt and a cleaner taste. They are the primary source of sweetness and texture in the treat. Without them, the cereal would simply fall apart.
Secondary Ingredient Spotlight: Rice Cereal |
Rice cereal provides the essential crunch. It offers a lightweight contrast to the heavy sweetness of the melted sugar. The air pockets in the cereal make the treats feel light rather than dense.
Using a toasted rice cereal adds a deeper, nuttier flavor profile. It helps the treat withstand the moisture of the marshmallows without becoming soggy. It is the skeleton that supports the whole structure.
Key Ingredients |
Gather these essentials to begin your spooky culinary adventure. Quality matters, especially with the fats and sugars.
- ●Butter — I prefer salted grass-fed butter for a richer flavor; skipping it results in a bland, overly sweet treat.
- ●Marshmallows — Use a name brand for consistent melting; skipping them means you have no binder.
- ●Rice Cereal — Crisped rice is the standard; skipping it removes the crunch.
- ●Food Coloring — Gel colors provide the most vibrant hues; skipping this means your treats stay white.
- ●Candy Eyes — These add the spooky character; skipping them makes them look like normal treats.
- ●Vanilla Extract — A pure extract adds depth; skipping it leaves the flavor a bit one-dimensional.
How to Make It |
Follow these steps carefully to ensure your treats are gooey and not rock-hard. Precision in temperature is the secret here.
- Grease the pan: To prevent the sticky mixture from clinging to the sides, lightly grease a baking pan with butter or line it with parchment paper. This ensures a clean release later.
- Melt the butter: To create a rich base, melt the butter in a large pot over low heat. Watch it closely so it does not brown or burn, as burnt butter can taste bitter.
- Dissolve the marshmallows: To create the binding agent, add marshmallows to the melted butter and stir constantly over low heat. Wait until they are completely smooth and liquid before proceeding. If you rush this, you will have lumps of marshmallow in your treats.
- Infuse the color: To get those haunting Halloween hues, stir in your food coloring and vanilla extract into the melted mixture. Stir vigorously until the color is uniform. You might also like Spooky Halloween Cookies Recipe Fun Creepy Treats Easy Halloween Dessert Ideas
- Fold in the cereal: To maintain the crunch of the cereal, remove the pot from the heat and stir in the rice cereal. Gently fold the cereal until every piece is coated in the colored marshmallow glue. Over-mixing can crush the cereal and make the treats too dense.
- Press into the pan: To ensure an even thickness, transfer the mixture to your prepared pan. Use a greased spatula or your fingers to press it down gently. Do not pack it too tightly, or the treats will become hard and difficult to chew.
- Decorate and set: To add the spooky elements, press candy eyes or themed sprinkles into the top while the mixture is still warm. Let them cool completely at room temperature. If you put them in the fridge too early, they may lose some of their chewiness.
1Small adjustments can lead to big improvements in the final result. Try these techniques for the best experience.
- ●2Low Heat Only: Always keep your stove on low. High heat caramelizes the sugar too much, making the treats hard.
- ●3Butter the Spatula: Grease your pressing tool with butter to avoid the mixture sticking to your hands.
- ●4Use Gel Colors: Gel food coloring is more concentrated than liquid. It gives a bolder color without thinning the marshmallow glue.
- ●5Don’t Over-Press: Press the mixture lightly. Air pockets are what make the treats light and fluffy.
- ●6Fresh Cereal: Ensure your rice cereal is fresh. Stale cereal will lose its snap and make the treat feel soggy. You could also try Irresistible Halloween Whoopie Pies For Spooky Treats
Delicious Variations |
Experimenting is part of the fun. Feel free to swap ingredients to suit your taste buds.
- ●Chocolate Monster: Stir in mini chocolate chips at the very end for a rich twist.
- ●Pumpkin Spice: Add a teaspoon of pumpkin pie spice to the melted butter.
- ●Vegan Version: Use vegan butter and dairy-free marshmallows for a plant-based treat.
- ●Peanut Butter Swirl: Swirl melted peanut butter into the top before cooling.
- ●Fruit Burst: Add dried cranberries or orange zest for a tart contrast.
These variations allow you to tailor the recipe to any dietary need or flavor preference. The possibilities are endless when you treat the kitchen like a laboratory.
Best Ways to Serve |
Presentation is everything during the Halloween season. Make your treats look as scary as they taste.
- ●Arrange them on a black platter to make the colors pop.
- ●Serve them alongside a bowl of warm apple cider.
- ●Cut them into shapes like ghosts, pumpkins, or bats using cookie cutters.
- ●Stack them in a pyramid for a dramatic dessert tower.
For a complete party spread, pair these with a savory option. A salty snack balances the sugar of the treats. It keeps guests coming back for more.
You could also serve them as part of a dessert board. Add some bowls of melted chocolate and candy corn for dipping. It creates an interactive experience for the guests.
Storage and Leftovers |
Refrigerating
Keep these treats in an airtight container in the fridge for up to 5 days. This prevents them from getting stale. Be aware that refrigeration can make them slightly firmer.
Reheating
To bring back the original gooey texture, pop a treat in the microwave for 5 to 10 seconds. Be very careful not to overdo it. Overheating will cause the marshmallows to melt and collapse. If you want something else, try Spooktacular Halloween Cauldron Cookie Recipe For Fun Treats
Freezing
These treats freeze remarkably well for up to 3 months. Wrap each square individually in plastic wrap before placing them in a freezer bag. Thaw them at room temperature for an hour before eating to restore the texture.
Frequently Asked Questions |
- ●Q: Why are my treats too hard to chew?A: This usually happens because the marshmallow mixture was overheated on the stove. When the sugar reaches too high a temperature, it turns into a hard candy state rather than remaining a soft glue. Always keep your heat on the lowest setting possible.
- ●Q: Can I use brown rice cereal for a healthier option?A: Yes, you can absolutely use brown rice cereal. It provides a slightly heartier flavor and more fiber. The texture remains very similar to white rice cereal, so the structure of the treat will not be affected.
- ●Q: How do I stop the food coloring from bleeding?A: Using gel-based food coloring is the best way to prevent bleeding. Gel colors are more concentrated and stable. Avoid adding too much liquid extract after the coloring, as excess moisture can cause the colors to run into each other.
- ●Q: Can I make these without butter?A: You can substitute butter with coconut oil or a vegan butter alternative. The butter provides the richness and prevents the treats from sticking too much. Without some form of fat, the treats will be overly sweet and have a rubbery texture.
- ●Q: What is the best way to cut them without sticking?A: Use a sharp knife and wipe it with a bit of butter or oil between every single cut. This prevents the sticky marshmallow from pulling on the treat and distorting the shape. Cutting them while completely cool is essential.
- ●Q: Can I add nuts to this recipe?A: Adding chopped nuts is a great way to add texture. Stir them in at the same time as the cereal. Just be mindful of allergies if you are serving these at a school party or a public event.
Why This Recipe Belongs in Your Weekly Rotation |
Having a reliable, fast dessert in your repertoire reduces stress during the busiest times of the year. These treats are a versatile tool for any celebration. They are a bridge between a simple snack and a fancy dessert.
The adaptability of the ingredients means you can change the theme for any holiday. Use red and green for Christmas or pink for Valentine’s Day. It is one base recipe with infinite potential.
Moreover, the joy of creating something visually exciting with your children is priceless. It turns a simple kitchen task into a bonding experience. That is the real magic of this recipe.
For a different kind of spooky treat, you might enjoy Spooky Vegan Ghost Pizza 5 Hauntingly Delicious Treats Vegan Halloween Party Food
Final Thoughts |
These Spooky Halloween Rice Crispy Treats combine the comfort of a childhood favorite with the excitement of the holiday season. They are colorful, chewy, and incredibly easy to customize for any creepy theme you can imagine.
You should make these because they require minimal effort but deliver maximum visual impact. They are the perfect solution for party hosting or simply treating your family to something special during October.
Grab your marshmallows and let your inner monster loose in the kitchen today!
Spooky Halloween Rice Crispy Treats Recipe – Fun & Easy
- Total Time: 25 minutes
- Yield: 12-16 squares 1x
Description
A festive, colorful twist on the classic rice crispy treat. These treats are easy to make and perfect for decorating with spooky eyes and colors for Halloween.
Ingredients
- 4 tablespoons unsalted butter
- 10 oz bag marshmallows
- 6 cups crisped rice cereal
- 1 teaspoon vanilla extract
- Gel food coloring (green, purple, or orange)
- Candy eyes for decoration
Instructions
- Grease a 9×9 inch pan with butter or line with parchment paper.
- Melt butter in a large pot over low heat.
- Stir in marshmallows until completely melted and smooth.
- Remove from heat; stir in vanilla extract and food coloring.
- Gently fold in the rice cereal until evenly coated.
- Press mixture lightly into the prepared pan.
- Press candy eyes into the top and let cool for 30 minutes before cutting.
- Prep Time: 10 minutes
- Cook Time: 15 minutes
- Category: Dessert
- Method: Stovetop
- Cuisine: American