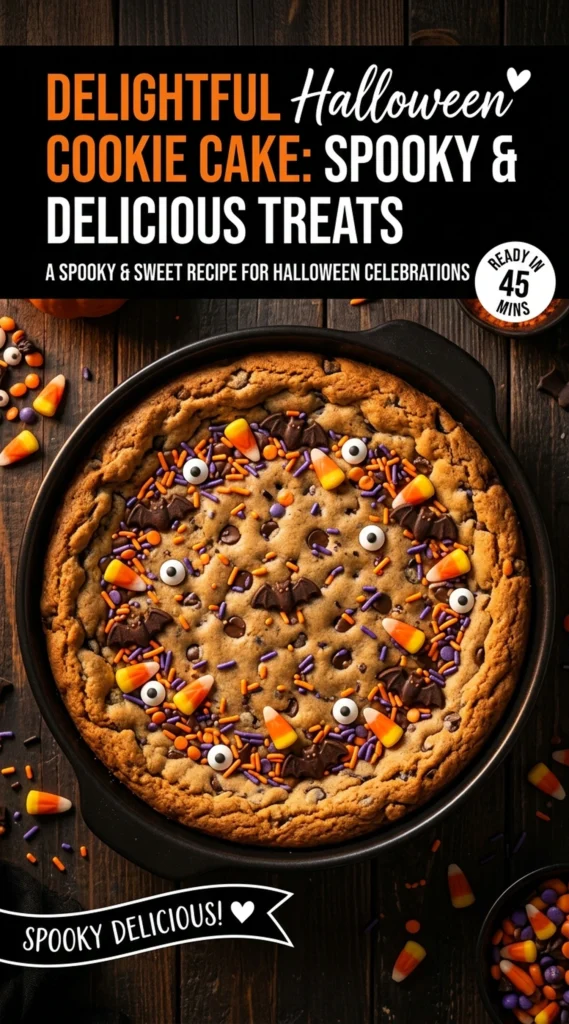
A large-format cookie offers the satisfaction of a cake with the chewy texture of a classic bakery treat.
This Halloween Cookie Cake is a giant, soft-baked chocolate chip cookie designed to serve as a centerpiece for festive gatherings.
Readers love this recipe because it combines the ease of a single-pan bake with the creative potential of themed decorating.
The scale makes it more impactful than individual cookies, providing a canvas for elaborate spooky designs.
Unlike store-bought versions that often taste overly processed, this homemade cake uses real butter and vanilla for a rich, nostalgic flavor.
It is a great choice for parents hosting school events or anyone looking for a crowd-pleasing dessert that requires minimal cleanup.
Follow the guide below to create a treat that looks as impressive as it tastes.
- ●Why You’ll Love This Recipe
- ●A Brief Background / Why This Recipe Works
- ●Perfect For Spooky Holiday Gatherings
- ●Main Ingredient Spotlight: Brown Sugar
- ●Secondary Ingredient Spotlight: Vanilla Extract
- ●Key Ingredients
- ●How to Make It
- ●Pro Tips
- ●Delicious Variations
- ●Best Ways to Serve
- ●Storage and Leftovers
- ●Frequently Asked Questions
- ●Why This Recipe Belongs in Your Weekly Rotation
- ●Final Thoughts
This recipe transforms a standard cookie into a celebratory event, offering a unique way to present a favorite flavor.
- ●The large size allows for creative Halloween piping and decorating.
- ●A single pan means fewer dishes than baking dozens of individual cookies.
- ●The texture remains chewy in the center and crisp at the edges.
- ●It pairs perfectly with a glass of cold milk or a hot cider.
- ●Preparation is straightforward and doesn’t require professional pastry skills.
- ●The cookie base stays moist for several days.
- ●It serves as a versatile base for many different candy toppings.
- ●Children can help with the decorating process.
This dessert is a reliable way to bring a festive touch to any October table without spending hours in the kitchen.
A Brief Background / Why This Recipe Works |
The success of a cookie cake depends on the balance between spread and structure. By using a higher ratio of brown sugar to granulated sugar, the dough retains moisture, preventing the center from drying out during the longer bake time required for a large disc.
The thickness of the dough ensures that the edges caramelize while the middle stays soft. This creates a contrast in textures that mimics a gourmet bakery style. When combined with a buttery frosting, the result is a decadent dessert that feels substantial.
Because the base is a classic flavor, it complements the often-sweet nature of Halloween candies. It provides a stable foundation for heavy frosting and decorations, making it more durable than a traditional sponge cake.
Perfect For Spooky Holiday Gatherings |
This dessert is ideal for themed parties where a focal point is needed. Its large size makes it easy to slice into wedges, ensuring every guest gets a piece of the spooky design.
For those prepping for a busy holiday weekend, the cookie can be baked a day in advance. This allows the baker to focus on the frosting and candy art right before the guests arrive.
It also works well for family-oriented celebrations. While adults enjoy the rich butter flavor, children are drawn to the colorful decorations. If you are planning a wider menu, this pairs well with Spooky Vegan Ghost Pizza 5 Hauntingly Delicious Treats Vegan Halloween Party Food for a full-themed meal.
Main Ingredient Spotlight: Brown Sugar |
Brown sugar is essential for the cookie cake’s identity. Its molasses content provides a deep, caramel-like aroma and a moist, chewy crumb that granulated sugar cannot replicate. This ingredient prevents the large cookie from becoming too brittle or cakey, maintaining that classic cookie-store density.
Secondary Ingredient Spotlight: Vanilla Extract |
Vanilla extract acts as the aromatic bridge between the butter and the sugar. It adds a floral warmth that enhances the chocolate chips and cuts through the richness of the frosting. Using a high-quality extract ensures the flavor is distinct and not artificial.
Key Ingredients |
The following components create the balance of flavor and structure needed for a giant cookie.
- ●Unsalted Butter — Provides a rich, creamy base and helps the cookie spread evenly.
- ●Brown Sugar — Adds moisture, chewiness, and a hint of molasses flavor.
- ●Granulated Sugar — Creates the crisp edges and helps with the browning process.
- ●Eggs — Bind the ingredients together and provide lift.
- ●All-Purpose Flour — Gives the cake its structure and prevents it from collapsing.
- ●Baking Soda — Reacts with the sugar to create a slight rise and golden color.
- ●Vanilla Extract — Adds a warm, aromatic depth to the dough.
- ●Chocolate Chips — Provide bursts of sweetness and a classic flavor profile.
- ●Buttercream Frosting — Used for piping spooky designs and securing candies.
How to Make It |
Follow these steps carefully to ensure the cookie bakes evenly without burning the edges.
- Prepare the pan: Grease a 9 or 12-inch springform pan or pizza pan with butter and line the bottom with parchment paper. This prevents the heavy dough from sticking and allows for easy removal.
- Cream the fats and sugars: Beat the softened butter with both sugars until the mixture is light and fluffy. This process incorporates air, which helps the cookie maintain a tender texture.
- Incorporate wet ingredients: Beat in the eggs one at a time, followed extract. Ensuring the eggs are fully emulsified prevents the dough from separating during baking.
- Mix dry ingredients: Whisk the flour, baking soda, and salt in a separate bowl before adding them to the wet mixture. Mixing them separately ensures the baking soda is evenly distributed, avoiding bitter clumps.
- Fold in the chips: Gently stir in the chocolate chips using a spatula. Avoid overmixing at this stage to keep the cookie from becoming tough.
- Press the dough: Spread the dough evenly into the prepared pan, smoothing the top with a spatula. Pressing it firmly into the corners ensures an even bake.
- Bake until set: Bake in the center of the oven until the edges are golden brown and the center is just set. Do not overbake, as the residual heat from the pan will continue to cook the center after removal.
- Cool completely: Let the cake cool in the pan for 15 minutes before transferring it to a wire rack. Frosting a warm cookie will cause the butter in the icing to melt and slide off.
- Decorate the surface: Pipe orange or purple frosting in spooky patterns and top with candy eyes or gummy worms. This is where the Halloween theme comes to life.
1These small adjustments can significantly improve the final result.
- ●2Room temperature ingredients: Ensure butter and eggs are at room temperature to create a smooth, stable emulsion.
- ●3Avoid over-mixing: Stop mixing the flour as soon as it disappears to prevent the gluten from making the cookie bread-like.
- ●4Use a thermometer: The center of the cookie is done when it reaches approximately 190F.
- ●5Chill the dough: If the dough feels too soft, chill it for 30 minutes before baking to limit excessive spreading.
- ●6Parchment is key: Always use parchment paper in the bottom of the pan for a clean release.
Delicious Variations |
You can easily adapt this recipe to suit different tastes or dietary preferences.
- ●Pumpkin Spice: Add two teaspoons of pumpkin pie spice and a tablespoon of pumpkin puree for a seasonal twist.
- ●White Chocolate Raspberry: Swap chocolate chips for white chocolate chunks and swirl in a raspberry reduction.
- ●Double Dark Chocolate: Replace a quarter cup of flour with cocoa powder and use dark chocolate chunks.
- ●Peanut Butter Swirl: Drop dollops of creamy peanut butter onto the dough and swirl them with a knife before baking.
- ●Oatmeal Spooky Cake: Use half rolled oats and half flour for a heartier, nuttier texture.
These variations allow you to experiment with flavors while keeping the reliable giant-cookie format.
Best Ways to Serve |
Presentation is a major part of the Halloween experience. Choose a method that fits your party style.
- ●Classic Wedges: Slice the cake into 8 to 12 triangles for traditional serving.
- ●Bite-Sized Squares: Cut the cake into small squares for a platter of finger foods.
- ●Warm with Ice Cream: Heat a slice in the microwave for 10 seconds and top with a scoop of vanilla bean ice cream.
To make the dessert more visually striking, place it on a black platter or a themed cake stand. Surround the base with additional candies or small decorative pumpkins to enhance the spooky atmosphere.
For a more sophisticated pairing, serve the cake alongside a warm beverage. A spiced latte or a dark roast coffee balances the sweetness of the buttercream and chocolate.
Storage and Leftovers |
Refrigerating
Store the frosted cookie cake in an airtight container in the refrigerator for up to 5 days. This keeps the frosting firm and the cookie moist.
Reheating
To refresh a slice, place it in the microwave for 5 to 10 seconds. Be careful not to overheat, as the frosting will melt quickly.
Freezing
Wrap unfrosted cookie cakes tightly in plastic wrap and foil for up to 3 months. Thaw in the refrigerator overnight before frosting.
Frequently Asked Questions |
- ●Q: Why did my cookie cake come out too thin?A: This usually happens if the butter was too melted or if the oven temperature was too low. Ensure your butter is softened but not oily, and check your oven with a thermometer to ensure it is reaching the correct heat.
- ●Q: Can I use a different pan if I don’t have a springform pan?A: Yes, a standard pizza pan or a round cake pan works well. If using a cake pan, make sure to grease it thoroughly and use parchment paper to ensure the cookie can be lifted out without breaking.
- ●Q: How do I stop the frosting from bleeding into the cookie?A: The most important step is ensuring the cookie is completely cold. Even a slight warmth in the center will cause the buttercream to liquefy and soak into the crumb, ruining the sharp lines of your decorations.
- ●Q: Can I make this recipe gluten-free?A: You can substitute all-purpose flour with a high-quality 1:1 gluten-free flour blend. Note that the texture may be slightly more crumbly, so let the cake cool completely before slicing to help it hold its shape.
- ●Q: What are the best candies to use for decorating?A: Candy corn, M&Ms in orange and black, and gummy worms work best. Use the frosting as a glue to secure these items to the top of the cake so they do not slide off during transport.
Why This Recipe Belongs in Your Weekly Rotation |
While this is a festive treat, the base recipe is a versatile foundation for any celebration. The ease of baking a single large cookie instead of individual portions makes it a practical choice for any household with a sweet tooth.
Its ability to be customized means it can transition from a spooky Halloween treat to a colorful birthday cake or a cozy winter dessert. The combination of chewy texture and rich flavor ensures it is always a hit with guests.
Incorporating this into your baking routine simplifies dessert prep while providing a high-impact result. It is a reliable, delicious way to bring people together around the table.
Final Thoughts |
This Halloween Cookie Cake combines the nostalgic charm of a chocolate chip cookie with the visual excitement of a holiday cake. It is a sturdy, delicious dessert that handles decorating with ease.
Whether you are hosting a large party or just want a themed treat for the family, this recipe offers a stress-free way to bake something memorable. The contrast of the buttery dough and spooky frosting makes it a seasonal essential.
Get your frosting ready and start creating your own hauntingly delicious masterpiece today!
Delightful Halloween Cookie Cake: Spooky & Delicious Treats
- Total Time: 0 hours
- Yield: 12 servings 1x
Description
A giant, chewy chocolate chip cookie cake topped with themed Halloween frosting and candies. Perfect for parties and spooky celebrations.
Ingredients
- 1 cup unsalted butter, softened
- 3/4 cup brown sugar, packed
- 3/4 cup granulated sugar
- 2 large eggs
- 1 teaspoon vanilla extract
- 2 1/4 cups all-purpose flour
- 1 teaspoon baking soda
- 1/2 teaspoon salt
- 2 cups semi-sweet chocolate chips
- 1 cup buttercream frosting (orange or purple)
Instructions
- Preheat your oven to 350F (175C). Grease a 9 or 12-inch springform pan and line the bottom with parchment paper.
- Cream together the softened butter, brown sugar, and granulated sugar in a large bowl until light and fluffy.
- Beat in the eggs one at a time, then stir in the vanilla extract.
- In a separate bowl, whisk together the flour, baking soda, and salt. Gradually add the dry ingredients to the wet mixture until just combined.
- Fold in the chocolate chips using a spatula.
- Press the dough evenly into the prepared pan, smoothing the top with a spatula.
- Bake for 20-25 minutes, or until the edges are golden brown and the center is set but still slightly soft.
- Allow the cake to cool completely in the pan before removing it from the sides.
- Pipe your chosen frosting over the top and decorate with Halloween candies.
- Prep Time: 20 minutes
- Cook Time: 20-25 minutes
- Category: Dessert
- Method: Baking
- Cuisine: American