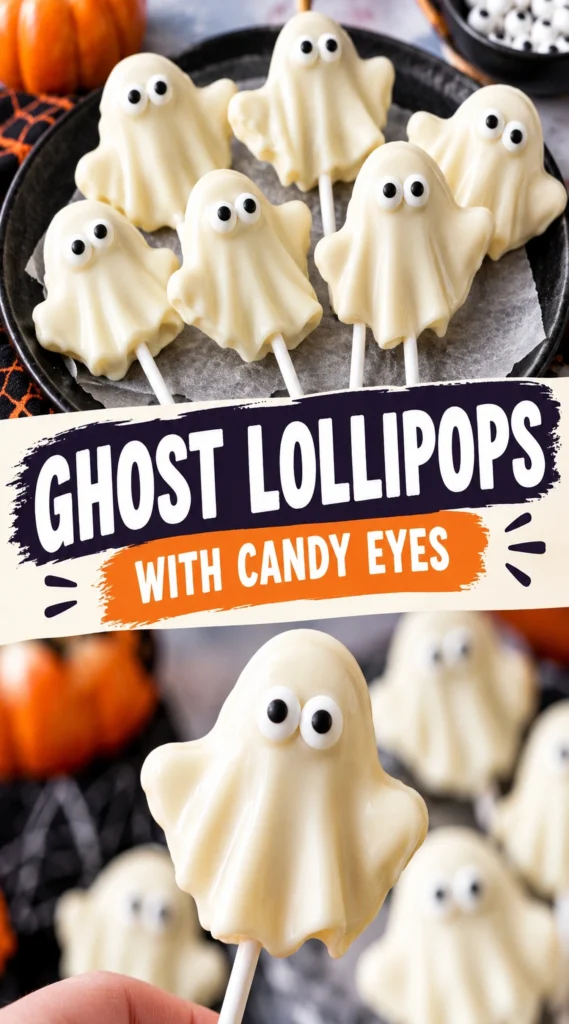
A simple bowl of melted white chocolate can be transformed into a fleet of friendly ghosts with just a few additions. These treats rely on the contrast between a creamy, sweet base and a playful visual punch.
Ghost Lollipops with Candy Eyes are bite-sized white chocolate candies shaped like spirits and perched on sticks. They combine the richness of cocoa butter with the sugary snap of candy decorations.
People enjoy these because they require no baking and offer a high visual impact for very little effort. The smooth texture of the white chocolate provides a clean canvas for the festive design.
Unlike store-bought holiday candies that often taste like wax, these homemade versions use real chocolate for a superior mouthfeel and a more authentic flavor profile.
This recipe is a great choice for parents wanting a low-stress activity to do with children during October. It teaches basic melting techniques and fine motor skills through decorating.
The process is straightforward, moving from the microwave to the parchment paper in minutes. Here is everything needed to create these spooky sweets.
- ●Why You’ll Love This Recipe
- ●A Brief Background on the Recipe
- ●Perfect For Halloween Party Platters
- ●White Chocolate Ingredient Spotlight
- ●Candy Eyes Ingredient Spotlight
- ●Key Ingredients
- ●How to Make It
- ●Pro Tips
- ●Delicious Variations
- ●Best Ways to Serve
- ●Storage and Leftovers
- ●Frequently Asked Questions
- ●Why This Recipe Belongs in Your Weekly Rotation
- ●Final Thoughts
These lollipops stand out because they balance a professional look with a beginner-friendly method. They provide a customizable way to add a whimsical touch to a dessert table.
- ●No oven required, which keeps the kitchen cool and safe for kids.
- ●Fast setting time allows for quick cleanup and immediate plating.
- ●The white chocolate base creates a stark, ghostly contrast against dark platters.
- ●Customizable expressions using different sizes of candy eyes.
- ●Small portion sizes make them ideal for guest grazing.
- ●Ingredients are readily available at most local grocery stores.
- ●The recipe scales easily for large school parties or small family gatherings.
- ●They pair beautifully with other themed treats like Irresistible Juicy Black Cocoa Ghost Cupcakes Recipe
The result is a treat that looks curated and artistic but takes very little time to assemble.
A Brief Background on the Recipe |
The concept of candy molds has existed for decades, but using free-form shapes on parchment paper allows for more character. Each ghost can have a slightly different silhouette, making them look more organic and less industrial.
White chocolate is the ideal medium here because it holds its shape well once cooled. Its high fat content allows it to glide smoothly across the paper before it firms up into a solid snap.
Adding edible eyes transforms a simple blob of chocolate into a character. This simple psychological shift makes the candy more engaging for children and adults alike.
The result is a playful confectionery item that prioritizes visual charm and a creamy, sweet taste.
Perfect For Halloween Party Platters |
These lollipops are a natural fit for themed dessert displays where height and variety are important. Placing them upright in a foam block or a jar of sprinkles adds a vertical element to the table.
They function well as party favors for children because they are individually portioned and easy to distribute. The sticks make them a mess-free option compared to loose candies.
For holiday gatherings, they complement larger desserts. If you are serving a Haunted House Cake With Candy Eyes Spooky Halloween Dessert Idea, these lollipops act as the perfect supporting act.
White Chocolate Ingredient Spotlight |
White chocolate provides the structural base and the primary flavor. Because it is made from cocoa butter, milk solids, and sugar, it has a creamy, buttery profile that melts quickly on the tongue.
The thickness of the chocolate is crucial for the ghost shape. Higher quality white chocolate with a lower sugar-to-fat ratio tends to set firmer and maintain its edges better during the cooling process.
Candy Eyes Ingredient Spotlight |
Candy eyes are the defining detail of this recipe. Usually made from a sugar-wafer or royal icing base, they provide a slight crunch that contrasts with the smoothness of the chocolate.
Using various sizes of eyes can change the emotion of the ghost. Larger eyes create a surprised look, while smaller, offset eyes make the ghosts appear mischievous or sleepy.
Key Ingredients |
A few high-quality items are all that is required to turn these spirits into a reality.
- ●White chocolate — Provides the creamy white color and the solid structure of the ghost.
- ●Candy eyes — Adds the facial detail and a small hit of sugar crunch.
- ●Lollipop sticks — Allows for easy handling and a professional presentation.
- ●Coconut oil — Optional addition to make the chocolate smoother and easier to melt.
How to Make It |
Follow these steps carefully to ensure the chocolate doesn’t burn and the ghosts maintain their shape.
- Prepare the surface: Line a baking sheet with parchment paper or a silicone mat. This prevents the chocolate from sticking and allows you to lift the ghosts easily once they are set.
- Melt the chocolate: Place white chocolate chips in a microwave-safe bowl. Heat in 30-second intervals, stirring between each session. Overheating white chocolate can cause it to seize or burn, so patience is key.
- Smooth the texture: Stir in a small amount of coconut oil if the chocolate feels too thick. This creates a glossier finish and helps the chocolate spread evenly on the paper.
- Pipe the shapes: Spoon or pipe the melted chocolate onto the parchment in irregular, teardrop shapes. Keep the bottom narrow and the top wider to mimic a floating spirit.
- Insert the sticks: While the chocolate is still wet, press a lollipop stick into the bottom narrow part of each ghost. Push it in far enough to be secure, but not so far that it touches the paper.
- Apply the eyes: Gently press two candy eyes into the wider top section of the ghost. Do this immediately before the chocolate begins to skin over, or the eyes will not adhere.
- Set the treats: Let the lollipops sit at room temperature for an hour or place them in the refrigerator for 15 minutes. Check that they are completely firm before attempting to move them.
1These small adjustments can make a big difference in the final look and taste of your treats.
- ●2Avoid water contact: Even a single drop of water in the melting bowl can cause white chocolate to seize into a clumpy mess.
- ●3Temper the chocolate: For a professional snap, melt the chocolate slowly and let it cool slightly before piping.
- ●4Use a piping bag: A ziplock bag with a corner cut off provides much more control than a spoon for creating ghost shapes.
- ●5Test the stick: Gently wiggle the stick after a few minutes of setting to ensure it is locked in place.
- ●6Add sprinkles: A tiny pinch of colorful sprinkles on the base can look like a ghostly aura.
Delicious Variations |
You can easily adapt this recipe to fit different dietary needs or flavor preferences.
- ●Dark Ghostly Shadows: Use dark chocolate for a more sinister, shadow-ghost look.
- ●Colored Spirits: Stir in a drop of oil-based food coloring to make pink or green ghosts.
- ●Nutty Centers: Press a single almond or cashew into the chocolate before it sets for a hidden crunch.
- ●Dairy-Free Option: Substitute white chocolate with coconut-based white chocolate melts.
- ●Flavor Infusion: Add a drop of peppermint extract to the melted chocolate for a wintery twist.
These changes allow you to match the lollipops to any specific party theme or flavor profile.
Best Ways to Serve |
Presentation is everything when it comes to holiday candies. Because these are on sticks, you have several creative options for display.
- ●Arrange them in a clear glass jar filled with orange and purple candies.
- ●Stick them into a halved Styrofoam ball covered in silver foil.
- ●Lay them across a dark platter alongside Irresistible Mouthwatering Cookie Dough And Candy Recipe
For a more interactive experience, serve them on a platter with different dips, such as a raspberry coulis or a chocolate ganache. The simple sweetness of the white chocolate pairs well with tart fruit flavors.
If serving at a party, keep them in a cool area to prevent the chocolate from softening, which can cause the ghosts to slide down the sticks.
Storage and Leftovers |
Refrigerating
Store the lollipops in an airtight container in the refrigerator for up to two weeks. This keeps them firm and prevents them from blooming.
Reheating
Do not reheat these treats. They are designed to be eaten cold or at room temperature; heating will cause them to melt and lose their shape.
Freezing
You can freeze these lollipops for up to one month. Wrap them individually in wax paper before placing them in a freezer bag to avoid flavor transfer.
Frequently Asked Questions |
- ●Q: Why did my white chocolate separate or become clumpy?A: This usually happens because the chocolate was overheated or came into contact with moisture. White chocolate has a lower burning point than dark chocolate, so it is important to melt it in short bursts and stir frequently to distribute the heat.
- ●Q: Can I use regular chocolate chips instead of baking bars?A: Yes, chocolate chips are often easier to melt because they contain stabilizers. However, ensure you are using a high-quality brand with cocoa butter to ensure the ghosts set firmly enough to stay on the lollipop sticks.
- ●Q: How do I stop the candy eyes from falling off?A: The key is timing. You must press the eyes into the chocolate while it is still completely liquid. If the chocolate has started to form a skin, the eyes will just sit on top and pop off once the treat is cold.
- ●Q: Can I make these in advance for a party?A: Absolutely. These can be made several days ahead of time. Just ensure they are stored in a cool, dry place or the refrigerator so they do not soften or stick together in the container.
- ●Q: What can I use if I don’t have lollipop sticks?A: You can substitute lollipop sticks with pretzel sticks for a salty-sweet combination or toothpicks for miniature versions. Just be mindful that toothpicks are smaller and may not be as stable for larger ghosts.
Why This Recipe Belongs in Your Weekly Rotation |
While not a daily meal, having a go-to, low-effort treat recipe is essential for seasonal hosting. These lollipops remove the stress of finding the perfect store-bought candy that actually tastes good.
The process is so fast that it can be slotted into a busy schedule. It is a way to create a sense of occasion and celebration without spending hours in the kitchen.
Final Thoughts |
Ghost Lollipops with Candy Eyes are a delightful blend of simplicity and creativity. Using just white chocolate and a few decorations, you can produce a professional-looking treat that appeals to all ages.
They are the ideal solution for those who want to add a spooky touch to their celebrations without the hassle of baking. The creamy taste and whimsical appearance make them a crowd-pleaser every time.
Gather your ingredients and start creating your own ghostly fleet for a truly magical Halloween experience.
Ghost Lollipops with Candy Eyes
- Total Time: 20 minutes
- Yield: 12 lollipops 1x
Description
Creamy white chocolate lollipops shaped like friendly ghosts and decorated with candy eyes. A quick, no-bake treat perfect for Halloween parties.
Ingredients
- 12 oz white chocolate chips
- 1 tbsp coconut oil
- 24 candy eyes
- 12 lollipop sticks
Instructions
- Line a baking sheet with parchment paper or a silicone mat.
- Place white chocolate chips in a microwave-safe bowl and heat in 30-second intervals, stirring in between until smooth.
- Stir in coconut oil until fully incorporated and the chocolate is glossy.
- Spoon or pipe the melted chocolate onto the parchment paper in irregular, teardrop shapes.
- Press a lollipop stick into the narrow bottom of each chocolate shape while still wet.
- Press two candy eyes into the wider top section of each ghost.
- Allow to set at room temperature for 1 hour or refrigerate for 15 minutes until firm.
- Prep Time: 15 minutes
- Cook Time: 5 minutes
- Category: Dessert
- Method: Melting
- Cuisine: American