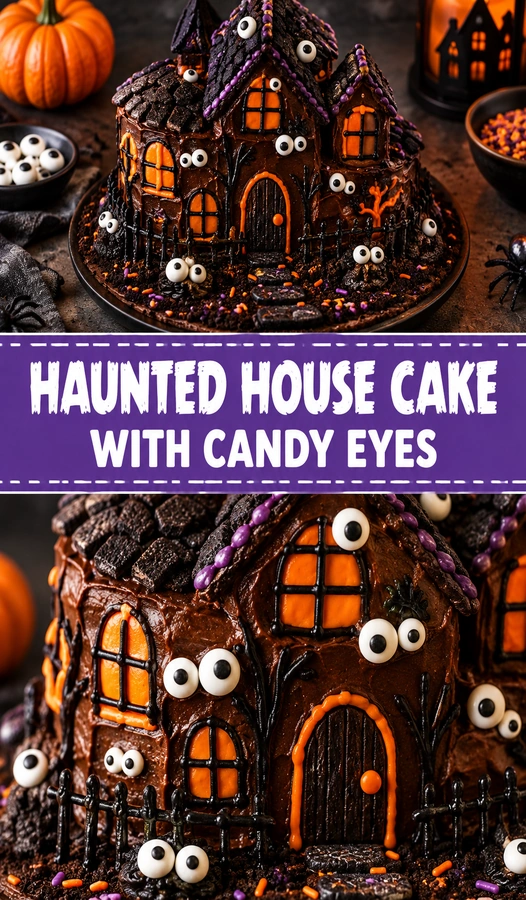
Dark chocolate frosting clings to jagged cake edges, creating a silhouette that looks like a derelict manor.
This Haunted House Cake with Candy Eyes transforms a standard chocolate cake into a creepy architectural masterpiece. It provides a visual centerpiece for any Halloween gathering without requiring professional pastry skills.
Guests love the contrast between the deep cocoa tones and the sudden, staring gaze of candy eyes peering from the frosting.
Unlike store-bought cakes that rely on plastic toppers, this version uses edible elements to build its eerie charm. Every part of the structure is meant to be eaten.
The recipe is ideal for those who want a high-impact dessert but lack hours of free time. Using pre-baked layers or a boxed mix allows the focus to remain on the creative assembly.
Follow these steps to build your own edible haunt.
- ●Why You’ll Love This Recipe
- ●A Brief Background on the Build
- ●Perfect For Spooky Parties and Family Activities
- ●Main Ingredient Spotlight: Chocolate Cake
- ●Secondary Ingredient Spotlight: Buttercream Frosting
- ●Key Ingredients
- ●How to Make It
- ●Pro Tips
- ●Delicious Variations
- ●Best Ways to Serve
- ●Storage and Leftovers
- ●Frequently Asked Questions
- ●Why This Recipe Belongs in Your Weekly Rotation
- ●Final Thoughts
Building a themed cake is often intimidating, but this design thrives on imperfection.
- ●Jagged edges make the house look more authentic and eerie.
- ●Candy eyes provide an instant, creepy personality with zero effort.
- ●Deep chocolate flavors appeal to both children and adults.
- ●The structure is stable enough for transport to parties.
- ●Customizable heights allow you to make a cottage or a skyscraper.
- ●It works perfectly with a variety of chocolate cake bases.
- ●Preparation can be split across two days to reduce stress.
- ●The visual payoff is significant compared to the actual labor.
This cake delivers the perfect balance of playful spookiness and rich flavor.
A Brief Background on the Build |
The concept relies on stacking cake layers of varying sizes to create a tiered, unstable appearance. smooth sides, the cake mimics the crumbling walls of an abandoned estate.
Chocolate serves as the foundation because its dark color naturally suggests shadows and decayed wood. Adding candy eyes in unexpected places—like the corners of the roof or hidden in the “bushes” of frosting—adds a psychological layer of spookiness.
This method is a great alternative to intricate fondant work. It focuses on texture and placement rather than precise sculpting, making it accessible for home bakers.
Perfect For Spooky Parties and Family Activities |
This dessert is a natural fit for Halloween bashes where a focal point is needed on the dessert table. Because the decoration is so visual, it serves as both a treat and a piece of decor.
Family baking nights benefit from this recipe because children can help place the candy eyes and spread the frosting. It turns a cooking task into a creative art project.
Since it uses standard pantry staples, it is a low-stress option for holiday hosting. You can easily pair this with other sweets like Indulge In Luscious Chocolate Candy Cane Cookies Recipe for a full dessert spread.
Main Ingredient Spotlight: Chocolate Cake |
Chocolate cake provides the necessary structural integrity and color for a haunted house. A dense, moist crumb prevents the layers from compressing too much under the weight of the upper tiers. The deep brown hue reduces the amount of food coloring needed in the frosting to achieve a “dark” look.
Secondary Ingredient Spotlight: Buttercream Frosting |
Buttercream acts as the mortar for the cake house. Its thickness allows it to hold the weight of the cake layers and keep the candy eyes from sliding down the sides.
Using a crusting buttercream is particularly helpful here. Once the frosting sets, it creates a stable surface that can be smeared or peaked to look like cobwebs or peeling paint.
Key Ingredients |
Each component is chosen to enhance the eerie aesthetic and the rich taste.
- ●Chocolate Cake — provides the dark, earthy base and the structure for the house.
- ●Buttercream Frosting — serves as the adhesive and the medium for creating spooky textures.
- ●Black Food Coloring — transforms the frosting into a midnight shade for a gothic feel.
- ●Candy Eyes — creates the unsettling sensation of being watched .
- ●Chocolate Sprinkles — adds a gritty, dirt-like texture to the base of the house.
- ●Fresh Raspberries — offers a pop of “bloody” color for decorative accents.
How to Make It |
Follow these steps to assemble your haunted manor from the ground up.
- Prepare the layers: Bake three different sized round cakes—large, medium, and small. Let them cool completely to prevent the frosting from melting, which would cause the house to lean or collapse.
- Level the cakes: Slice the tops off each cake layer with a serrated knife to create flat surfaces. This ensures the tiers sit securely on top of one another without sliding.
- Stack the structure: Place the largest cake on the platter and spread a thick layer of frosting on top. Center the medium cake on top of the first, then repeat with the smallest cake to create a towering effect.
- Apply the crumb coat: Spread a thin layer of frosting over the entire exterior to seal in crumbs. Chill the cake for 20 minutes until the layer is firm, which prevents crumbs from ruining the final dark coating.
- Frost the exterior: Apply the black-tinted buttercream using irregular strokes. Avoid making the sides smooth; instead, create peaks and valleys to mimic ruins and weathered walls.
- Place the candy eyes: Press candy eyes into the frosting at varying heights and angles. Cluster some together and leave others solitary to create a more erratic and haunting appearance.
- Add the ground details: Press chocolate sprinkles around the base of the bottom layer to look like soil. Add a few raspberries or drops of red gel for a dramatic, spooky finish.
1Use these techniques to refine your spooky creation.
- ●2Freeze your layers: Slightly freezing the cake layers before stacking makes them easier to handle and less likely to crumble.
- ●3Use gel coloring: Choose gel-based black food coloring instead of liquid to avoid thinning the buttercream.
- ●4Stagger the eyes: Place some eyes partially hidden behind frosting peaks to make them look like they are peeking out from the walls.
- ●5Avoid over-mixing: When coloring the frosting, fold the dye in gently to maintain the aeration and stiffness.
- ●6Support the weight: For very tall cakes, insert a wooden dowel through the center of all layers to prevent the structure from shifting.
Delicious Variations |
Modify the flavor and look to suit your specific party theme.
- ●Red Velvet Base: Use red velvet cake for a “bloody” interior that surprises guests when they cut into the house.
- ●Ghostly White: Use white frosting and black candy eyes for a ghostly, pale aesthetic.
- ●Candy Graveyard: Surround the cake with tombstones made from rectangular cookies and chocolate frosting.
- ●Pumpkin Spice Twist: Swap chocolate for pumpkin cake and use orange frosting for a more traditional autumn feel.
- ●Candy Bar Garnish: Add chunks of Irresistible Peanut Butter Candy Bar Fudge Recipe Delight around the base for added richness.
These changes allow you to adapt the cake for different dietary preferences or visual styles.
Best Ways to Serve |
Presentation is key when serving a themed dessert like this.
- ●Place the cake on a black matte platter to make the colors pop.
- ●Surround the base with dry ice for a smoking, foggy effect.
- ●Serve slices with a side of vanilla bean ice cream to balance the rich chocolate.
- ●Use a sharp, warm knife to get clean cuts through the dense layers.
Lighting the area with purple or green LEDs can enhance the eerie mood of the dessert table.
Because the cake is tall, serve it in a room with plenty of space so guests can admire the design before it is sliced.
Storage and Leftovers |
Refrigerating
Keep the cake in an airtight container in the refrigerator for up to 5 days. The frosting will harden, which actually helps maintain the house’s shape over time.
Reheating
Do not reheat the entire cake. Instead, let individual slices sit at room temperature for 30 minutes before eating to allow the buttercream to soften naturally.
Freezing
Wrap individual slices in plastic wrap and foil, then freeze for up to 3 months. Thaw in the fridge overnight before moving to room temperature.
Frequently Asked Questions |
- ●Q: How do I stop the cake from leaning?A: Ensure your cake layers are perfectly level the domes. If the cake is very tall, use a central support like a wooden dowel or a sturdy straw pushed through the middle of all layers to lock them in place.
- ●Q: Can I use a boxed cake mix for this?A: Yes, boxed mixes work perfectly for this recipe. The key is to follow the instructions for a denser cake or slightly reduce the liquid to ensure the layers can support the weight of the tiers.
- ●Q: What is the best frosting for stability?A: An American buttercream or a Swiss Meringue buttercream is ideal. These provide the stiffness needed to hold the candy eyes and create the jagged, structural peaks that look like crumbling walls.
- ●Q: How do I get the frosting truly black?A: Start with a chocolate buttercream base rather than vanilla. Adding black gel coloring to chocolate frosting requires much less dye than adding it to white frosting, preventing a chemical aftertaste.
- ●Q: Do the candy eyes melt in the frosting?A: High-quality sugar-based candy eyes generally hold up well. However, ensure the frosting is completely cooled and the cake is chilled before applying them to prevent any bleeding or melting. Always keep in mind that results can vary depending on your specific ingredients, equipment, and kitchen conditions, so taste as you go and adjust accordingly for the best outcome.
Why This Recipe Belongs in Your Weekly Rotation |
While a haunted house cake is a seasonal specialty, the technique of tiered assembly is a valuable skill for any home baker. Once you master the balance of stacking and frosting, you can create themed cakes for any holiday of the year.
The recipe emphasizes creativity over precision, making it a low-stress way to introduce children to baking. It encourages experimentation with textures and shapes, turning a dessert into a family bonding activity.
Adding a bit of whimsy to your desserts makes them more memorable. Whether it is for a party or a themed Friday night, this cake brings a sense of playfulness to the kitchen.
Final Thoughts |
This Haunted House Cake combines a rich chocolate foundation with an unsettling, creative design. candy eyes and irregular frosting, you can build a professional-looking spooky centerpiece at home.
It is a rewarding project that balances flavor and visual impact. The ability to customize the heights and colors means you can tailor the level of spookiness to your guests’ preferences.
Grab your frosting and candy eyes to start building your own edible nightmare today.
Haunted House Cake with Candy Eyes
- Total Time: 1 hour 45 minutes
- Yield: 12 servings 1x
Description
A towering chocolate cake designed to look like a crumbling haunted house, decorated with an array of creepy candy eyes for a spooky Halloween effect.
Ingredients
- 3 chocolate cakes (one 8-inch, one 6-inch, one 4-inch)
- 4 cups buttercream frosting
- 2 tablespoons black gel food coloring
- 1 pack candy eyes (various sizes)
- 1/2 cup chocolate sprinkles
- 1 cup fresh raspberries
Instructions
- Bake or prepare the three different sized chocolate cakes and allow them to cool completely.
- Level the tops of each cake with a serrated knife to ensure a flat stacking surface.
- Place the 8-inch cake on a platter, spread frosting on top, then center the 6-inch cake on top. Repeat with the 4-inch cake.
- Apply a thin crumb coat of frosting over the entire cake and refrigerate for 20 minutes.
- Mix black gel food coloring into the remaining buttercream until a deep midnight shade is achieved.
- Frost the exterior with the black buttercream using irregular, jagged strokes to create a weathered look.
- Press candy eyes into the frosting at random intervals and heights across the cake walls.
- Apply chocolate sprinkles around the base for a soil effect and garnish with raspberries for pops of red.
- Prep Time: 45 minutes
- Cook Time: 60 minutes
- Category: Dessert
- Method: Baking
- Cuisine: American