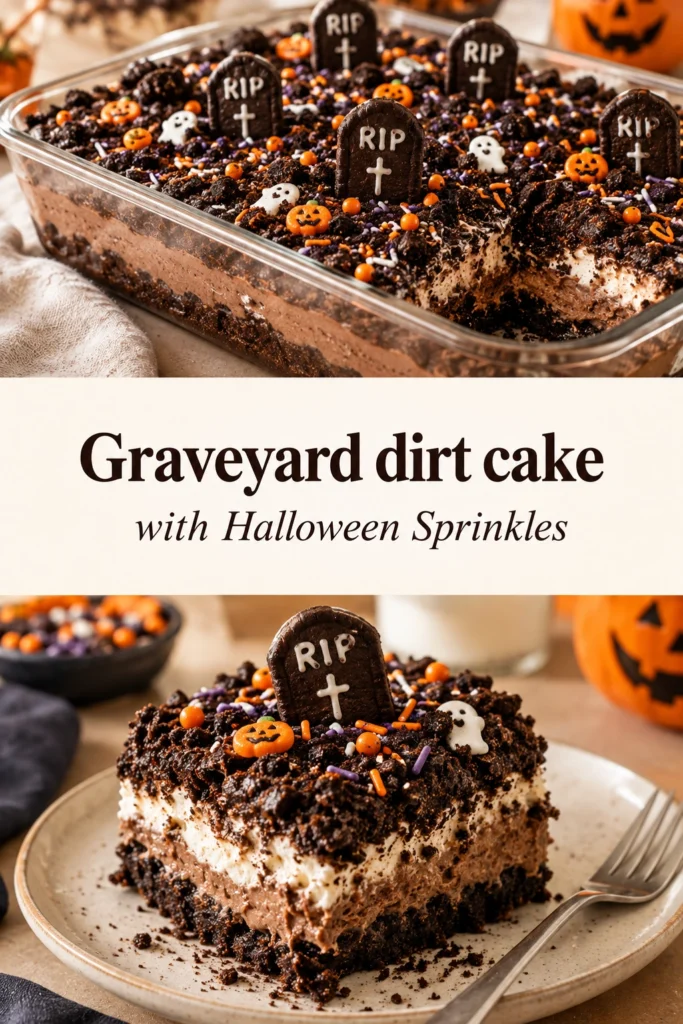
This dessert delivers a cool, creamy texture paired with the crunch of chocolate cookies, making it a refreshing treat for autumn gatherings.
Graveyard dirt cake is a layered pudding dessert topped with crumbled chocolate wafers and spooky decorations to resemble a cemetery.
Many people appreciate this recipe because it requires no baking and can be assembled quickly using a few pantry staples.
The use of specific Halloween sprinkles adds a bright, colorful contrast to the deep brown of the cocoa crumbs.
Unlike store-bought pudding cups, this homemade version allows you to control the sweetness and add fresh textures like gummy worms.
It is an ideal choice for parents hosting a children’s party or anyone looking for a visually striking centerpiece.
The following guide provides the steps to assemble this dessert with a professional finish.
- ●Why You’ll Love This Recipe
- ●A Brief Background on Why This Recipe Works
- ●Perfect For Spooky Parties and Family Gatherings
- ●Main Ingredient Spotlight: Chocolate Wafers
- ●Secondary Ingredient Spotlight: Instant Pudding Mix
- ●Key Ingredients
- ●How to Make It
- ●Pro Tips
- ●Delicious Variations
- ●Best Ways to Serve
- ●Storage and Leftovers
- ●Frequently Asked Questions
- ●Why This Recipe Belongs in Your Weekly Rotation
- ●Final Thoughts
This dessert balances the richness of chocolate with a light, airy cream filling that isn’t overly heavy.
- ●No oven required for assembly.
- ●Visually impressive with minimal effort.
- ●Customizable with various spooky candy additions.
- ●Kid-friendly flavors and textures.
- ●Ingredients are readily available at most grocery stores.
- ●Holds its shape well when chilled.
- ●Fast preparation time for busy hosts.
- ●Versatile enough to be served in a large bowl or individual cups.
These factors make it a reliable go-to for any October celebration.
A Brief Background on Why This Recipe Works |
The combination of fat from the cream cheese and the starch in the pudding creates a stable mousse-like consistency. This prevents the “dirt” from sinking into the filling over time.
Chocolate wafers provide a specific grain size that mimics actual soil more effectively than crushed Oreo cookies, which can be too chunky.
Adding a layer of chilled cream allows the flavors to meld, ensuring that the sweetness of the sprinkles doesn’t overpower the chocolate.
The result is a dessert that satisfies both the visual theme of Halloween and the craving for a rich chocolate treat.
Perfect For Spooky Parties and Family Gatherings |
This recipe is ideal for holiday parties where you need a dessert that can be made a day in advance. Because it is chilled, you can clear your counter space before guests arrive.
Family dinners during October benefit from this treat as it engages children in the decorating process. Letting kids place the “tombstones” and sprinkles makes it an activity as well as a dessert.
It also works well for school events or potlucks since it transports easily in a chilled container.
Main Ingredient Spotlight: Chocolate Wafers |
Chocolate wafers are essential because they produce a fine, sandy crumble when crushed. This texture is what gives the cake its “dirt” appearance. If you omit these, the dessert loses its thematic visual and its necessary crunch, becoming a standard pudding parfait.
Secondary Ingredient Spotlight: Instant Pudding Mix |
Instant pudding provides the structural foundation of the cake. It thickens almost immediately upon mixing, which allows you to layer the dessert without the ingredients bleeding into each other.
The chocolate flavor in the mix complements the cookie crumbs, creating a cohesive taste profile throughout the dish.
Key Ingredients |
These components work together to create the creamy, crumbly layers of the dessert.
- ●Chocolate Wafers — these are crushed to create the soil layer and provide a crunchy contrast.
- ●Instant Chocolate Pudding Mix — this forms the thick, sweet base of the filling.
- ●Cold Milk — this activates the pudding mix and creates the desired creamy consistency.
- ●Cream Cheese — this adds a tangy richness and stabilizes the pudding mousse.
- ●Whipped Topping — this lightens the texture and adds volume to the cream layer.
- ●Halloween Sprinkles — these provide pops of color and a festive aesthetic.
- ●Gummy Worms — these add a playful, chewy element to the graveyard theme.
How to Make It |
Follow these steps carefully to ensure the layers remain distinct and the texture is smooth.
- Prepare the cookie crumbs: Place chocolate wafers in a food processor or a sealed plastic bag. Pulse or crush them until they resemble coarse sand. Avoid over-processing into a powder, as you want some small pebbles for a realistic look.
- Mix the pudding base: In a large bowl, whisk the instant chocolate pudding mix with cold milk. Stir for about two minutes until the mixture begins to thicken and no clumps of powder remain.
- Blend in the cream cheese: Beat the softened cream cheese in a separate bowl until smooth. Gradually fold the cream cheese into the pudding mixture. Ensure it is fully incorporated to avoid white streaks in the chocolate filling.
- Fold in the whipped topping: Gently stir in the whipped topping using a spatula. Use a folding motion rather than stirring vigorously to keep the air in the mixture, which prevents the cake from becoming too dense.
- Layer the ingredients: Spread a thin layer of cookie crumbs at the bottom of a glass bowl or trifle dish. Pour half of the cream mixture over the crumbs, then add another layer of crumbs. Top with the remaining cream.
- Apply the top soil: Cover the entire top surface with a thick layer of chocolate wafer crumbs. Press down lightly so the toppings don’t slide off.
- Decorate the graveyard: Place gummy worms emerging from the crumbs. Scatter Halloween sprinkles across the surface and insert rectangular cookies as tombstones. For more variety, consider adding a Graveyard Dirt Cake With Red Velvet Frosting Spooky Halloween Dessert Recipe for a different color palette.
- Chill the dessert: Place the dish in the refrigerator for at least two hours. This allows the pudding to set completely and the flavors to merge.
1Use these techniques to improve the presentation and stability of your cake.
- ●2Softened Cream Cheese: Ensure the cream cheese is truly at room temperature to prevent lumps in the filling.
- ●3Cold Milk: Use milk straight from the fridge; warm milk will prevent the instant pudding from setting properly.
- ●4Avoid Over-Mixing: When folding in whipped topping, stop as soon as the streaks disappear to maintain a fluffy texture.
- ●5Layering Tool: Use an offset spatula to smooth the cream layers for a cleaner look through the glass.
- ●6Sprinkle Timing: Add the sprinkles just before serving if they are prone to bleeding colors into the chocolate crumbs.
Delicious Variations |
You can modify the base ingredients to suit different dietary needs or flavor preferences.
- ●Mocha Twist: Stir a tablespoon of instant espresso powder into the pudding mix for a coffee-chocolate flavor.
- ●Dairy-Free: Substitute the milk with almond milk and use a vegan cream cheese alternative.
- ●Nutty Soil: Mix finely chopped walnuts or pecans into the cookie crumbs for added depth.
- ●Fruit Addition: Add a layer of fresh raspberries between the cream and crumbs for a tart contrast.
- ●Minty Graveyard: Use a mint-chocolate pudding mix for a refreshing seasonal change.
These changes allow you to adapt the dessert for guests with different tastes.
Best Ways to Serve |
Presentation is key for a themed dessert like this one.
- ●Serve in a large glass trifle bowl to showcase the layers.
- ●Portion into individual clear plastic cups for easy party grabbing.
- ●Place the bowl on a platter surrounded by Pumpkin Patch Cupcakes With Halloween Sprinkles Easy Fall Dessert Recipes to create a dessert spread.
Using individual cups is particularly helpful for children’s parties, as it eliminates the need for messy scooping and sharing.
For a more adult atmosphere, serve the cake with a side of fresh berries or a drizzle of dark chocolate ganache.
Storage and Leftovers |
Refrigerating
Store the cake in an airtight container in the refrigerator for up to 4 days. Keep it covered to prevent the cookie crumbs from absorbing fridge odors.
Reheating
This is a chilled dessert and should not be reheated. Heating will melt the cream cheese and whipped topping, ruining the texture.
Freezing
The pudding base can be frozen for up to 2 weeks. However, the cookie crumbs will soften, so it is best to freeze only the filling and add fresh crumbs before serving.
Frequently Asked Questions |
- ●Q: Can I use Oreo cookies instead of chocolate wafers?A: Yes, you can use Oreos, but you should remove the white cream filling first. The chocolate wafers provide a more uniform, sandy texture that looks more like dirt, whereas Oreos can be slightly chunkier.
- ●Q: How do I keep the “tombstones” from falling over?A: Push the cookies deep into the cream layer before adding the final top layer of crumbs. This provides a stable anchor so the cookies stand upright throughout the party. Feel free to experiment once you are comfortable with the base recipe — small tweaks to seasoning, cooking time, or ingredient ratios can personalise the dish to suit your taste.
- ●Q: Will the sprinkles bleed into the chocolate crumbs?A: Some highly pigmented sprinkles may bleed if they sit on moist crumbs for too long. To avoid this, apply the sprinkles immediately before serving the dessert to your guests. Feel free to experiment once you are comfortable with the base recipe — small tweaks to seasoning, cooking time, or ingredient ratios can personalise the dish to suit your taste.
- ●Q: Can this be made in a slow cooker?A: This is a no-bake, chilled recipe, so a slow cooker is not necessary. Using a slow cooker would melt the cream cheese and whipped topping, destroying the mousse-like consistency of the cake.
- ●Q: What is the best way to serve this to a large crowd?A: Individual 5-ounce clear cups are the most efficient method. They allow every guest to see the layers and make the dessert portable, which is ideal for mingling at a party.
Why This Recipe Belongs in Your Weekly Rotation |
While this is a themed dessert, the core combination of chocolate and cream is a crowd-pleaser that works beyond Halloween. the spooky decorations, it becomes a classic chocolate trifle.
The ease of assembly means you can satisfy a dessert craving without spending hours in the kitchen or cleaning up piles of baking sheets.
It provides a reliable way to introduce fun, creative elements into your cooking routine, making dessert time an event for the whole family.
Final Thoughts |
This Graveyard Dirt Cake combines a rich chocolate base with a light, airy cream and a satisfying cookie crunch. Its visual appeal makes it a standout for October, while the simple ingredients keep it accessible.
Making this recipe allows you to create a festive atmosphere without the stress of complex baking. It is a practical solution for anyone who wants a high-impact dessert with low-effort preparation.
Gather your ingredients and bring a bit of spooky fun to your table tonight.
Graveyard Dirt Cake with Halloween Sprinkles
- Total Time: 20 minutes
- Yield: 8 servings 1x
Description
A no-bake layered chocolate dessert featuring a creamy pudding mousse and crushed chocolate wafer ‘dirt’ topped with festive Halloween decorations.
Ingredients
- 1 package (14 oz) chocolate wafer cookies
- 1 package (3.4 oz) instant chocolate pudding mix
- 3 cups cold milk
- 8 oz softened cream cheese
- 1 container (8 oz) whipped topping, thawed
- 1/4 cup Halloween sprinkles
- 1 package gummy worms
- 6–8 rectangular cookies for tombstones
Instructions
- Crush the chocolate wafer cookies in a food processor or plastic bag until they resemble coarse sand.
- Whisk together the instant chocolate pudding mix and cold milk in a large bowl for 2 minutes until thickened.
- Beat the softened cream cheese until smooth, then fold it into the pudding mixture until fully combined.
- Gently fold in the whipped topping using a spatula until no streaks remain.
- In a glass bowl, layer a thin coating of cookie crumbs, then half of the pudding mixture, then another layer of crumbs.
- Top with the remaining pudding mixture and a final, thick layer of cookie crumbs.
- Decorate by adding gummy worms, Halloween sprinkles, and rectangular cookies as tombstones.
- Refrigerate for at least 2 hours before serving.
- Prep Time: 20 minutes
- Cook Time: 0 minutes
- Category: Dessert
- Method: No-Bake
- Cuisine: American