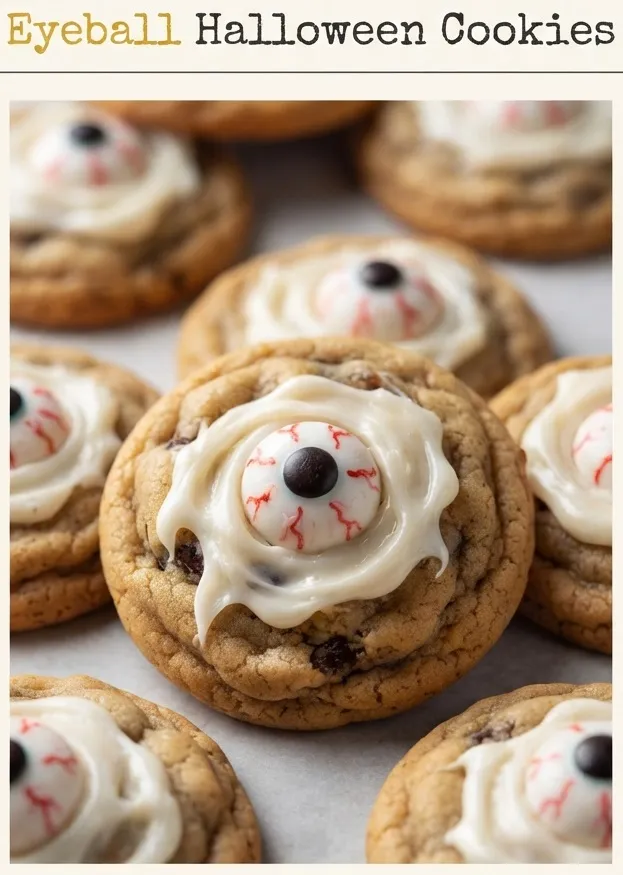
Stop searching for party treats because this is the only recipe for eyeball cookies you will ever need.
These treats combine a buttery, soft base with a visual that is genuinely unsettling. They look professional but require zero advanced pastry skills.
Readers love these because they balance a classic cookie taste with a high-impact visual gimmick. The contrast of the white icing against the colorful iris is striking.
What makes this version unique is the specific ratio of cream cheese to butter, ensuring a cookie that doesn’t spread into a pancake. Most recipes fail here.
Store-bought cookies lack the fresh, homemade aroma and the customizability of the ‘eyes’ found here. You control the creep factor.
This recipe is perfect for parents hosting school parties or anyone who wants to win a neighborhood baking contest. It is a crowd-pleaser for all ages.
Let’s get into the precise details to ensure your batch comes out perfectly.
- ●Why You’ll Love This Recipe
- ●A Brief Background / Why This Recipe Works
- ●Perfect For Spooky Parties and Family Traditions
- ●Main Ingredient Spotlight: Butter
- ●Secondary Ingredient Spotlight: Cream Cheese
- ●Key Ingredients
- ●How to Make It
- ●Pro Tips
- ●Delicious Variations
- ●Best Ways to Serve
- ●Storage and Leftovers
- ●Frequently Asked Questions
- ●Why This Recipe Belongs in Your Weekly Rotation
- ●Final Thoughts
You will appreciate how these cookies manage to be both appetizing and horrifying at the same time.
- ●Visual impact is immediate and shocking.
- ●Ingredients are likely already in your pantry.
- ●Preparation time is minimal for the results delivered.
- ●Texture remains soft for several days.
- ●Customizable colors allow for diverse eye types.
- ●Kid-friendly process makes for a great activity.
- ●No expensive specialty equipment is required.
- ●Perfect balance of sweetness and richness.
- ●Reliable results even for beginner bakers.
- ●Highly portable for school or office events.
These cookies prove that you don’t need to be a professional cake artist to create a show-stopping dessert.
A Brief Background / Why This Recipe Works |
The secret to a great eyeball cookie is the structure of the base. If the cookie spreads too much, you lose the rounded shape necessary for a realistic eye.
I almost gave up on this recipe until I discovered that adding a small amount of cream cheese to the dough prevents excessive spreading. It adds a subtle tang that cuts through the sugar.
Why does the icing need to be so stiff? Stiff royal icing is the only way to get those clean, sharp circles that don’t bleed into the white background.
The combination of a soft, chewable cookie and a crisp icing shell creates a satisfying textural contrast. This makes the treat more than just a visual gag.
Everything about this recipe is designed for stability and visual precision. Spooky Halloween Cookies Recipe Fun Creepy Treats
Perfect For Spooky Parties and Family Traditions |
Busy weeknights are usually a disaster for baking, but these can be prepped in advance. You can bake the bases on a Tuesday and decorate them on Thursday.
Meal prep applies to desserts too. Once the dough is chilled, you can scoop and bake in small batches throughout the week to keep them fresh.
Family dinners during October benefit from a themed dessert that gets children involved. Let the kids pipe the pupils for a chaotic, creepy look.
Holidays are the primary stage for these treats. They fit perfectly on a tiered platter alongside other sinister sweets.
Main Ingredient Spotlight: Butter |
Butter provides the essential fat that creates a tender crumb and a rich, melt-in-your-mouth feel. I always use unsalted European-style butter for a higher fat content and better stability.
If you skip butter or use a low-quality margarine, the cookies will taste flat and will likely spread too much in the oven. You lose the structural integrity required for a round cookie.
Secondary Ingredient Spotlight: Cream Cheese |
Cream cheese acts as a secret stabilizer in the dough. It prevents the cookies from flattening out while adding a professional, bakery-style depth to the flavor.
Using a full-fat block of cream cheese is non-negotiable here. Low-fat versions contain too much water, which will ruin the texture of your dough.
Without this ingredient, your cookies might look more like pancakes than eyeballs. It is the difference between a mediocre treat and a masterpiece.
Key Ingredients |
Quality ingredients ensure the flavor matches the impressive look of these treats.
- ●Unsalted Butter — provides richness and structural fat.
- ●Cream Cheese — stabilizes the dough and adds a slight tang.
- ●Granulated Sugar — creates sweetness and helps with browning.
- ●All-Purpose Flour — the primary structure of the cookie.
- ●Egg — binds the ingredients together.
- ●Vanilla Extract — adds a classic aromatic depth.
- ●Powdered Sugar — the base for the smooth icing.
- ●Food Coloring — creates the realistic iris and pupil colors.
How to Make It |
Follow these steps exactly to avoid the common pitfalls of holiday baking.
- Cream the fats: Beat the softened butter and cream cheese together in a large bowl until the mixture is pale and fluffy. You want to avoid any lumps of cream cheese, as these will create uneven pockets in your cookies.
- Incorporate the sugar: Add the granulated sugar and mix on medium speed until combined. Don’t over-beat at this stage or you will incorporate too much air, which causes the cookies to puff up and then collapse.
- Add the binders: Stir in the egg and vanilla extract one at a time. If the mixture looks like it is curdling, just add a tablespoon of your measured flour to smooth it back out.
- Fold in dry ingredients: Slowly mix in the flour until just combined. Stop as soon as the white streaks disappear; over-mixing develops gluten, which makes the cookies tough instead of tender. Delectable Witch Finger Cookies A Spooky Halloween Treat
- Chill and scoop: Place the dough in the fridge for at least 30 minutes. Scoop rounded tablespoons onto a parchment-lined sheet, leaving two inches between them so they don’t merge into one giant eye.
- Bake and cool: Bake at 350F for about 10-12 minutes. Look for edges that are barely golden; if you overbake them, the cookies will be too hard to bite through comfortably.
- Ice the whites: Once completely cool, pipe a circle of white royal icing on each cookie. Make sure the icing is thick enough to hold its shape without running toward the edges.
- Create the iris: Drop a smaller circle of colored icing in the center of the white. Use a toothpick to swirl the colors slightly for a more realistic, organic look.
- Finish the pupil: Place a tiny dot of black icing in the center of the iris. Let the cookies set for at least two hours before moving them so the icing doesn’t smudge.
1Small adjustments in technique can lead to a much more professional result.
- ●2Room temperature ingredients: Ensure your butter and eggs are at room temperature to prevent the batter from breaking.
- ●3Parchment is key: Never grease the pan with butter; use parchment paper to prevent the cookies from sliding and losing their shape.
- ●4Toothpick detailing: Use a toothpick to drag a tiny bit of white icing over the pupil to create a ‘highlight’ for a 3D effect.
- ●5Icing consistency: If your icing is too runny, add powdered sugar half a teaspoon at a time until it forms a stiff peak.
- ●6Cooling time: Never ice a warm cookie. The icing will melt instantly and slide off the sides. Spooky Halloween Cookies Recipe Fun Creepy Treats Easy Halloween Dessert Ideas
Delicious Variations |
You can easily tweak this recipe to suit different tastes or dietary needs.
- ●Chocolate Base: Replace a quarter cup of flour with cocoa powder for a dark, moody base that makes the white icing pop.
- ●Gluten-Free Option: Use a high-quality 1:1 gluten-free flour blend to ensure the structure remains stable.
- ●Citrus Twist: Add a teaspoon of lemon zest to the dough for a bright, refreshing contrast to the sweet icing.
- ●Almond Extract: Swap vanilla for almond extract for a more sophisticated, nutty flavor profile.
- ●Vegan Swap: Use vegan butter and a flax egg, though you may need to chill the dough longer to prevent spreading.
Experimenting with colors can also change the vibe from ‘spooky’ to ‘alien’ or ‘fantasy’.
Best Ways to Serve |
Presentation is everything when it comes to themed Halloween treats.
- ●Arrange them on a black slate platter for maximum color contrast.
- ●Place them inside a glass apothecary jar for a ‘specimen’ look.
- ●Serve alongside a red berry punch to simulate a bloody crime scene.
Do you want to surprise your guests? Place these cookies inside a hollowed-out pumpkin for a hidden treat. It adds an element of discovery to the dessert table.
Pairing these with a strong coffee or a dark tea helps balance the sugar from the royal icing. Spooky Witches Fingers A Sinister Delight For Halloween Easy Halloween Cookies
Storage and Leftovers |
Refrigerating
Store these in an airtight container in the fridge for up to 5 days. The cream cheese in the dough keeps them moist, but keep the container sealed to avoid odors.
Reheating
Do not reheat these cookies if they have been iced. The royal icing will melt or crack. If you have un-iced cookies, a quick 5 seconds in the microwave is sufficient.
Freezing
Freeze the baked, un-iced cookies for up to 3 months. Wrap them tightly in plastic wrap and foil. Thaw at room temperature before icing. Spooktacular Halloween Cauldron Cookie Recipe For Fun Treats
Frequently Asked Questions |
- ●Q: Why did my cookies spread so much in the oven?A: This usually happens if the butter was too soft or if you skipped the chilling step. Chilling the dough firms up the fats, ensuring the cookies hold their round shape during the initial bake.
- ●Q: How do I stop the icing from bleeding into other colors?A: The key is to let each layer of icing dry completely. Let the white base set for at least 30 minutes before adding the iris, and let that set before the pupil.
- ●Q: Can I use store-bought frosting instead of royal icing?A: I strongly advise against this because store-bought frosting is too soft. It will slump and run, meaning your eyeballs will look like melting puddles instead of crisp circles. Always keep in mind that results can vary depending on your specific ingredients, equipment, and kitchen conditions, so taste as you go and adjust accordingly for the best outcome.
- ●Q: What is the best food coloring to use for the eyes?A: Gel food colors are far superior to liquid drops. Gel provides a deep, saturated color without adding extra moisture to the icing, which keeps your circles sharp and stable. Feel free to experiment once you are comfortable with the base recipe — small tweaks to seasoning, cooking time, or ingredient ratios can personalise the dish to suit your taste.
- ●Q: My royal icing is too thick to pipe, what should I do?A: Add water one drop at a time while stirring slowly. Be very careful, as it only takes a tiny amount of liquid to turn stiff icing into a runny mess.
Why This Recipe Belongs in Your Weekly Rotation |
While this is a themed treat, the base cookie is a versatile masterpiece. You can bake the cookies without the icing and use them as a standard treat for any day of the week.
The reliability of this dough makes it a safe bet for any occasion. You get a consistent texture every single time, regardless of the weather or oven quirks.
It teaches basic baking and decorating skills that can be applied to other recipes. Once you master the royal icing, you can decorate anything.
Including this in your repertoire means you are always prepared for the unexpected party invite. It is a high-reward, low-stress addition to your baking list.
Final Thoughts |
These cookies combine a buttery, soft texture with a visually striking design that perfectly captures the spirit of Halloween. From the stabilized dough to the precision of the royal icing, every detail is designed for success.
You should make these because they offer the perfect balance of simplicity and impact. They allow you to create a professional-looking dessert that tastes like a childhood favorite without requiring hours of labor.
Grab your apron and start baking these terrifying treats to bring some delicious horror to your kitchen tonight!
Eyeball Halloween Cookies
- Total Time: 57 minutes
- Yield: 24 cookies 1x
Description
A buttery, soft cookie base topped with realistic royal icing eyeballs. Perfectly creepy for Halloween parties and easy for all skill levels.
Ingredients
- 1/2 cup unsalted butter, softened
- 4 oz cream cheese, softened
- 3/4 cup granulated sugar
- 1 large egg
- 1 tsp vanilla extract
- 2 cups all-purpose flour
- 1/2 tsp baking soda
- 1/4 tsp salt
- 2 cups powdered sugar
- 2 tbsp milk or water
- Gel food coloring (red, blue, green, black)
Instructions
- Preheat oven to 350F and line baking sheets with parchment paper.
- Cream together butter and cream cheese until smooth and fluffy.
- Beat in sugar, egg, and vanilla extract until well combined.
- Stir in flour, baking soda, and salt until just combined.
- Chill dough in the refrigerator for 30 minutes.
- Scoop rounded tablespoons of dough and place on baking sheets.
- Bake for 10-12 minutes or until edges are barely golden.
- Cool cookies completely on a wire rack.
- Mix powdered sugar and milk to create a stiff royal icing.
- Pipe a white circle on each cookie, then add a colored iris and a black pupil.
- Prep Time: 45 minutes
- Cook Time: 12 minutes
- Category: Dessert
- Method: Baking
- Cuisine: American